
Have you ever planned a cozy evening in your RV only to find that the water heater isn’t working? It’s frustrating when you’re ready to relax but can’t enjoy a hot shower or wash dishes. You’re not alone—many RV owners face this issue, especially when hitting the road for the first time or after a long winter.
Key Takeaways
- Common Issues: The RV water heater can fail due to lack of power supply, faulty thermostat, or gas supply problems. Identifying the issue is crucial for effective troubleshooting.
- Troubleshooting Steps: Secure all electrical connections, inspect the propane supply, and test the heating element to determine the cause of malfunction.
- Maintenance Practices: Regular inspections, flushing the tank annually, and checking anode rods are essential for prolonging the life and efficiency of your RV water heater.
- Signs for Professional Help: Indications like unusual noises, inconsistent heating, leaks, or persistent error codes suggest the need for expert assistance to avoid further damage.
- Cost Considerations: Understanding the potential costs for diagnostics, repairs, or full replacement helps in making informed decisions about maintaining or upgrading your RV water heater.
Common Causes of RV Water Heater Not Working
Understanding common causes helps you troubleshoot your RV water heater effectively. Here’s a look at potential issues you might encounter.
Recommended Products

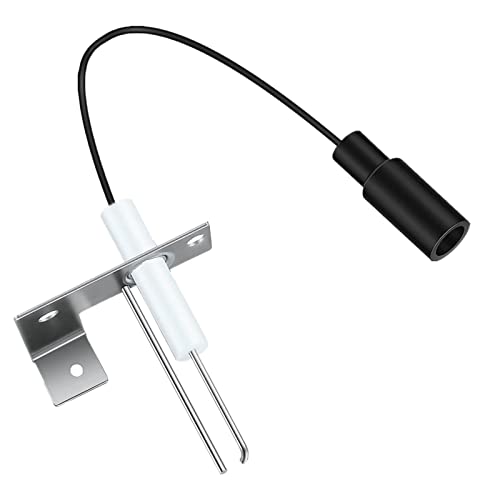
[ Water Heater Igniter with Spark Probe ]: the Rv Water Heater Replacement Parts is a Local Sense Electrode Spark Probe for Atwood Water Heaters , It is a Necessary Accessory for Safe Operation of RV Electric Water Heaters
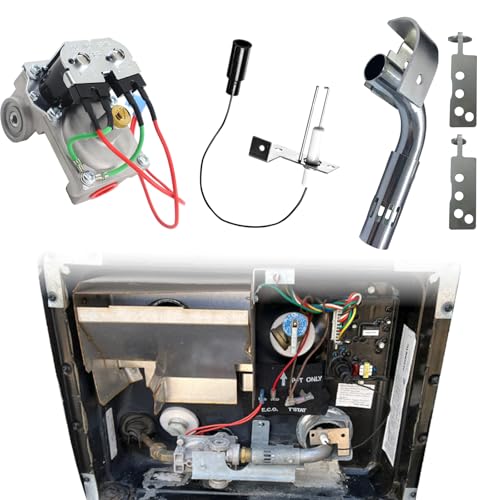
All-in-One Fit for Atwood (Dometic: 91638 Only):This 3-piece kit (93844 Gas Valve, 93868 Igniter, 91638 Burner Tube) fits Atwood 6-10 gallon RV water heaters, compatible with models like GC6AA-10E, GCH6-4E, G10-3E, G6A-4E/6E/8E, and EXT series (G9EXT/G16EXT). Replaces OEM #93870 (93844), #93868 (igniter), #91638/96206 (burner tube) — Dometic compatible only for 91638 (not for other 2 parts)
Lack of Power Supply
Check the power sources for your RV water heater. If it runs on electricity, ensure the circuit breaker hasn’t tripped. A blown fuse can also interrupt power supply. For gas water heaters, verify that the battery is functioning and connected properly.
Faulty Thermostat
Inspect the thermostat setting. If it’s set too low, the heater won’t activate. A malfunctioning thermostat can also prevent the heater from working. If you notice inconsistencies in hot water availability, consider replacing the thermostat.
Gas Supply Issues
Examine your gas supply if your water heater runs on propane. Ensure the gas tank is filled and securely connected. Check for leaks around the connections using soapy water; bubbles indicate a leak. If the gas burner isn’t igniting, the issue could stem from clogged burner ports or a faulty igniter.
Troubleshooting Steps
When your RV water heater isn’t working, follow these troubleshooting steps to diagnose and resolve the issue effectively.
Checking Electrical Connections
Ensure all electrical connections are secure. Check the circuit breaker and reset it if necessary. Examine the wiring for signs of damage or disconnection. Use a multimeter to measure voltage; you need at least 120 volts for proper functioning. If connections seem loose or corroded, tightening or cleaning them can often restore functionality.
Inspecting the Propane Supply
Inspect your propane tank and ensure it’s full. A low tank can cause the water heater to malfunction. Check the gas lines for leaks using soapy water; any bubbles indicate a leak. Verify that the propane valve is open. Examine the regulator and ensure it’s functioning correctly; replacing a faulty regulator may resolve gas supply issues.
Testing the Heating Element
Test the heating element for continuity using a multimeter. Remove the access panel and disconnect the wires carefully. A reading between 10 to 40 ohms indicates a good element. If there’s no continuity, you’ll need to replace the heating element. Reconnect everything securely and restore power to see if the water heater operates correctly.
By following these steps, you can quickly identify and fix the issues with your RV water heater.
Maintenance Tips for RV Water Heaters
Maintaining your RV water heater helps ensure consistent performance and longevity. Regular care can prevent inconvenient malfunctions and keep your water hot when you need it.
Recommended Products

Upgrade from Aluminum: Magnesium provides superior cathodic protection for your Suburban tank compared to standard aluminum rods. When choosing an RV anode rod, consider the nut type based on water conditions. Steel nuts suit softer water, while galvanized nuts offer better durability in harsh, mineral-rich environments. Also, pick the right rod size: Suburban models need a 9.25" x 3/4" NPT rod; Atwood models require a 4.5" x 1/2" NPT rod. Don’t overlook these essentials for your water heater!

FITS MULTIPLE MODELS: This product is compatible with Atwood 93868 models, including GCH6-4E, GCH6-6E, GCH6-7E, GCH6A-10E, GC6AA-10E, GC6A-7E, GH6-3E, GH6-4E, GH6-6E, GH6-7E, GH6-8E, G6A-2E, G6A-3E, G6A-4E, G6A-8P, G6A-6E, G6A-7E, G6A-8E, GCH6A-7E, GCH6A-8E, GCH6A-9E, GC6AA-7E, GC6AA-8E, GC6AA-9E, GCH10A-2E, GCH10A-3E, GC10A-2E, GC10A-3E, G10-1E, GH10-1E, G610-3E, GH610-3E, G10-2E, G10-3E, GC10-1E, GC10-2E, GH10-2E, GH10-3E, GC10A-4E, GCH10A-4E, and XT 6 & 10-gallon spark ignition models.

Integrated Kit: 3 in 1 RV Water Heater Repair Kit Includes: 91365 RV Water Heater Control Circuit Board, 91447 Thermal Cut Off & ECO Thermostat, 93868 Spark Probe Igniter Electrode. It provides a one-stop repair and replacement solution for ignition failure, unstable water temperature, fuse blowing, etc, RV water heater issues, an essential maintenance kit for RV owner.
Regular Inspections
Regular inspections keep your water heater in top shape. Check for signs of wear, leaks, or corrosion at least once a season. Inspect the wires, connections, and general condition of the heater. Pay attention to unusual sounds, like popping or rumbling, as they can indicate sediment buildup. If you notice any issues, address them promptly.
Flushing the Tank
Flushing your water heater tank removes sediment buildup and improves efficiency. You should flush the tank at least once a year. To do this, follow these steps:
- Turn off the water heater and let it cool down.
- Connect a hose to the drain valve and direct it to a suitable area.
- Open the drain valve and allow the water to flow out.
- Close the drain valve, refill the tank, and repeat if necessary.
This process enhances performance and extends the life of your heater.
Checking Anode Rods
Checking anode rods is vital for preventing corrosion. These rods attract corrosive elements, extending the life of the tank. Inspect the anode rod every one to two years. If it’s less than 50% intact, replace it. To check:
- Turn off the water heater and relieve pressure.
- Remove the anode rod using a socket wrench.
- Assess its condition and replace if necessary.
Regular checks and timely replacements keep your water heater functioning well and protect it from deterioration.
When to Seek Professional Help
You may need to seek professional help if troubleshooting doesn’t resolve your RV water heater issues. Some problems require expertise beyond basic repairs.
Signs of Major Issues
Look for signs indicating significant problems with your RV water heater. These include:
- Unusual Noises: If you hear banging, popping, or hissing sounds, it could signal sediment buildup or a faulty heating element.
- Inconsistent Heating: If water temperature fluctuates between hot and cold during use, it may indicate a malfunctioning thermostat or heating element.
- Leaks: Any water pooling around the base suggests leaks, potentially from tank corrosion or loose connections.
- Error Codes: If your water heater displays error codes, refer to the manual. Persistent codes often require expert attention.
Cost Considerations
Understand potential costs associated with professional repairs or replacement of your water heater. Costs can vary based on the type of issue and the level of service needed:
- Diagnostic Fees: Expect to pay between $75 and $150 for a professional diagnostic assessment.
- Repair Costs: Minor repairs may range from $100 to $400, depending on parts and labor.
- Replacement Costs: Should replacement be necessary, budget between $800 and $2,500 for a new unit and installation.
Assess the severity of the issue and compare it with potential repair costs. If repair expenses approach replacement value, replacing the unit often proves more economical in the long run.
Conclusion
Dealing with a malfunctioning RV water heater can be a real hassle but you don’t have to let it ruin your adventures. By following the troubleshooting steps and maintenance tips shared in this post you can keep your water heater running smoothly. Regular checks and quick fixes can save you from those chilly showers and dishwashing dilemmas.
If you find yourself stuck or facing bigger issues don’t hesitate to reach out for professional help. After all your comfort and enjoyment on the road are worth it. Happy travels and may your water always be warm!
Frequently Asked Questions
What should I do if my RV water heater isn’t working?
If your RV water heater isn’t working, check the power supply, ensure the thermostat is set correctly, and examine the gas supply for leaks or clogs. Start by inspecting electrical connections, resetting the circuit breaker, and using a multimeter to check voltage.
How often should I maintain my RV water heater?
It’s recommended to perform maintenance on your RV water heater at least once a year. Regular inspections help catch wear, leaks, or corrosion, and flushing the tank annually removes sediment buildup, improving efficiency.
When should I replace the anode rod in my RV water heater?
You should check the anode rod every one to two years and replace it if it shows significant wear. This rod prevents corrosion in the tank, prolonging the life of your water heater.
What are signs that I need professional help for my RV water heater?
Look for signs like unusual noises, inconsistent heating, leaks, and error codes. If troubleshooting doesn’t resolve the issue, it may be time to seek professional assistance to avoid further damage.
How can I troubleshoot my RV water heater efficiently?
To troubleshoot, start by ensuring a proper power supply and checking your thermostat settings. Inspect the gas supply for leaks and check electrical connections. Use a multimeter to verify voltage and test the heating element for continuity.

Hey, I’m Jake. I focus on cooling systems at Appliance Mastery, like fridges, freezers, and air conditioners.
I’ve worked in appliance repair for more than ten years and I’m certified through NASTeC. I’ve seen just about every fridge issue you can imagine.
My goal is to help you fix problems without stress. Whether it’s a freezer that won’t cool or an AC that keeps beeping, I’m here to walk you through it.