
Replacing the fill valve in a Whirlpool washer is a straightforward process that can restore proper water flow during the wash cycle. This guide provides step-by-step instructions to help you complete the installation quickly and efficiently.
Whirlpool Washer Fill Valve Tools Needed
To successfully replace the fill valve in your Whirlpool washer, having the right tools on hand is essential. This section outlines the specific tools required for the installation process, ensuring you can complete the task efficiently and effectively. Being prepared will help you avoid unnecessary delays and make the replacement as smooth as possible.
Before starting the replacement, ensure you have all necessary tools and supplies ready. This preparation will streamline the process and minimize interruptions. Here’s what you need:
Replacement fill valve compatible with your Whirlpool washer model
Screwdriver set (flathead and Phillips)
Adjustable wrench
Towel or sponge to absorb any water spills
Bucket to catch residual water
Recommended Products

𝟏𝟓 𝒀𝑬𝑨𝑹𝑺 𝙂𝙐𝘼𝙍𝘼𝙉𝙏𝙀𝙀--- 𝑺𝑼𝑷𝑷𝑶𝑹𝑻 𝟏𝟓 𝒀𝑬𝑨𝑹𝑺 𝘼𝙁𝙏𝙀𝙍-𝙎𝘼𝙇𝙀𝙎 𝙎𝙀𝙍𝙑𝙄𝘾𝙀. Beaquicy attaches great importance to the shopping experience of each customer.If you have any quality problem during guarantee period,please contact customer service in time.Customer satisfaction is our tireless pursuit.During the use of the product, you may encounter situations where the product does not work. It may be the accumulation of scale or other impurities in the water valve, which hinders the entry of the water flow. If you encounter this situation, please contact us immediately, and we will help you arrange a re-fund or replace the product
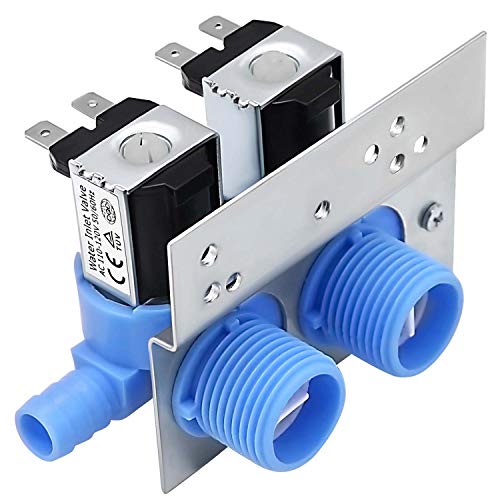
Inlet valve 285805 Meets 0EM Standards Unparalleled Durability

Compatible Washer Model: This W11210459 W10869799 Washer Water Inlet Valve can be compatible with Whirlpool, Kenmore, May-tag, Crosley, Amana, Inglis, Roper, Admiral washer. It can fix the following problems--Leaks, Irregular water flow, Irregular water temperature, Machine will not stop filling with water or will not fill with water
Whirlpool Washer Safety Precautions Before Repair
Before diving into the replacement of your Whirlpool washer’s fill valve, it’s crucial to prioritize safety. Understanding and implementing the necessary precautions can prevent accidents and ensure a smooth repair process. This section outlines essential safety measures to take before starting your installation.
Safety is crucial when working on appliances. Always disconnect the washer from the power source before beginning any repairs.
Turn off the water supply to prevent leaks. Here are some additional safety tips:
Wear safety goggles to protect your eyes from debris
Use gloves to avoid sharp edges
Ensure the area is dry to prevent slips
Whirlpool Washer Old Fill Valve Removal Steps
Replacing the fill valve in your Whirlpool washer is essential for maintaining optimal performance. This section outlines the precise steps to safely remove the old fill valve, ensuring a smooth transition to the new component. Follow these instructions carefully to avoid any complications during the replacement process.
To replace the fill valve, you must first remove the old one. Follow these steps carefully to avoid damaging any components.
Disconnect the water supply hoses from the back of the washer.
Remove the back panel of the washer using a screwdriver.
Locate the fill valve and take note of how it is connected.
Unscrew the mounting screws holding the fill valve in place.
Disconnect the electrical connector from the valve.
Whirlpool Washer Fill Valve Symptoms and Causes
Understanding the symptoms and causes of a malfunctioning fill valve in your Whirlpool washer is crucial for effective troubleshooting. Common issues can lead to improper filling, leaks, or no water flow at all. Identifying these problems early can save time and prevent further damage to your appliance.
| Symptom | Primary Suspect | Difficulty (1-5) |
|---|---|---|
| Washer not filling with water | Faulty fill valve | 3 |
| Water overflowing during cycle | Stuck fill valve | 4 |
| Slow filling | Clogged valve filter | 2 |
Whirlpool Washer New Fill Valve Installation
Replacing the fill valve in your Whirlpool washer can seem daunting, but with the right guidance, the process becomes straightforward. This section provides a step-by-step approach to installing a new fill valve, ensuring your washer functions efficiently and reliably. Follow these instructions to restore optimal performance to your appliance.
With the old fill valve removed, you can now install the new one. This step is critical for ensuring proper operation.
Position the new fill valve in the same location as the old one.
Secure it with screws to hold it in place.
Reconnect the electrical connector to the new valve.
Attach the water supply hoses to the valve, ensuring they are tight.
Recommended Products

【285805 WATER INLET VALVE】285805 Water Inlet Valve lets water into your washing machine during the prewash cycle. When the inlet valve 285805 body breaks or the solenoid valve fails, your washer may stop filling or start leaking. ➤The package includes 1 x 285805 Water Inlet Valve. This water inlet valve meets or exceeds original manufacturer specifications for performance and fit. ➤Replace the 285805 water inlet valve if your washer has any of the FOLLOWING PROBLEMS: Poor water fill. Washer does not fill with water. Water filling is slow. Water leakage. Will not stop filling with water. No hot or cold water

COMPATIBLE WITH YOUR WASHER--285805 Water Inlet Valve is compatible with a wide range of washers, including Whirlpool, Kenmore, and Kitchen-Aid. Replaces Part Numbers - 21026, AP3094541, 285805VP, 292197, 3349451, 3354565, 3360387, 3360388, 3360389, 3360391, 3360392, 3429537, 358992, 370067, 388328, 3952163, 3952164, 3955673, 8228, 868761,PS334646, and W10110517.Easy fix your irregular water injection with your kenmore Whirlpool washer
Problem-solving: The W11210459 water inlet valve can fix issues like leaks, irregular water flow, and temperature problems. It can also address problems where the machine won't stop filling with water or won't fill at all
Whirlpool Fill Valve Functionality Testing
Understanding the functionality of your Whirlpool washer’s fill valve is essential for ensuring optimal performance. This section will guide you through the testing process, helping you identify any issues that may affect water flow and overall washing efficiency. Proper testing can save time and prevent further complications during your fill valve replacement.
After installation, it’s essential to test the new fill valve to ensure it functions correctly. Follow these steps:
Turn on the water supply slowly.
Plug the washer back in and run a short cycle.
Observe for leaks around the fill valve and hoses.
Check the water flow to ensure it fills properly.
Whirlpool Washer Fill Valve Replacement Issues
When dealing with a Whirlpool washer, fill valve issues can disrupt your laundry routine. Common problems include leaks, slow filling, or no water entering the drum at all. Understanding these issues is essential for effective troubleshooting and ensuring a smooth replacement process.
Sometimes, issues may arise even after replacing the fill valve. Here are some common problems and their solutions:
Water leaks: Ensure all connections are tight and check for damaged hoses.
No water flow: Confirm that the water supply is turned on and not clogged.
Intermittent filling: Inspect the electrical connections for corrosion or damage.
Recommended Products

[W10144820 Replaces Part Numbers] : WPW10144820,W10311458, W1AP6015761, PS11749042, EAP11749042, W10140914, W10140911, AP4371093, PS2347919, W10311458, PS11749042 etc.

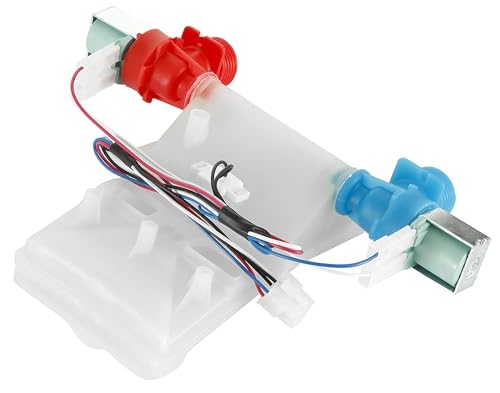
W11165546 W11096267 Valve :Washer Water Inlet Valve W11165546 With Mounting Bracket, precisely controlling the water flow into the washer. It is specifically designed for well - known brands such as Whirlp.ool, M.aytag, Kenmore, and Crosley, ensuring a perfect fit and hassle - free installation.Replaces Valve Part: W10758828 W10839828 and W11096267 33090105, W10599423,W11096267,W11165546VP,4545980,AP6284346,PS12348013,EAP12348013,W11165546(120 V 60 HZ)
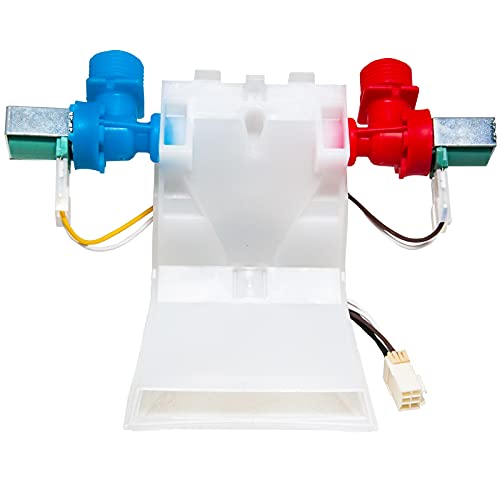
Washer Water Inlet Valve-- W10144820 Washer Water Inlet Valve has the functions of balancing the temperature of cold and hot water, controlling the water level and draining water.
Whirlpool Washer Pre-Use Final Checks
Before diving into the replacement of your Whirlpool washer’s fill valve, it’s essential to conduct a series of final checks. These pre-use assessments ensure that your washer is ready for the installation process and can help prevent potential issues down the line, making the task smoother and more efficient.
Before returning the washer to regular use, perform these final checks:
Ensure the back panel is securely reattached.
Verify that all tools are removed from the area.
Confirm that the washer is level to avoid vibrations during operation.
Whirlpool Washer Fill Valve Installation Steps
Replacing the fill valve in your Whirlpool washer can seem daunting, but with the right steps, the process becomes manageable. This guide outlines the essential installation steps to ensure your washer operates efficiently and effectively. Follow these instructions carefully to restore your appliance to optimal working condition.
Disconnect power and water supply
Remove the old fill valve
Install the new fill valve securely
Test for leaks and proper operation
Following these steps will help you successfully replace the fill valve in your Whirlpool washer. This maintenance task can improve the efficiency of your appliance and extend its lifespan.

Hey, I’m Jake. I focus on cooling systems at Appliance Mastery, like fridges, freezers, and air conditioners.
I’ve worked in appliance repair for more than ten years and I’m certified through NASTeC. I’ve seen just about every fridge issue you can imagine.
My goal is to help you fix problems without stress. Whether it’s a freezer that won’t cool or an AC that keeps beeping, I’m here to walk you through it.