
A Whirlpool dryer lint screen that won’t go in can often be fixed by cleaning the screen and its housing. If the issue persists, inspecting for damage or misalignment is essential to restore proper function.
Whirlpool Dryer Lint Screen Problems to Recognize
When dealing with a lint screen that won’t go in, recognizing the symptoms can help pinpoint the problem. Common signs include the screen not fitting snugly, making unusual noises during operation, or the dryer not effectively drying clothes. Understanding these symptoms will guide you in troubleshooting effectively.
| Symptom | Primary Suspect | Difficulty (1-5) |
|---|---|---|
| Lint screen won’t fit | Clogged lint housing | 2 |
| Screen makes noise | Misaligned screen | 3 |
| Dryer not drying | Damaged lint screen | 4 |
Whirlpool Dryer Lint Screen and Housing Inspection
Inspecting the lint screen and housing of your Whirlpool dryer is crucial for maintaining optimal performance and safety. A thorough examination can reveal common issues that may prevent the lint screen from fitting properly. Understanding these components will help you troubleshoot effectively and ensure your dryer operates efficiently.
Before proceeding with repairs, closely examine the lint screen and its housing. A buildup of lint can obstruct the screen, preventing it from sliding in smoothly. Cleaning both components is a straightforward first step.
Remove the lint screen from the dryer.
Inspect the screen for any visible damage.
Clear lint from the screen and housing using a soft brush or vacuum attachment.
Whirlpool Dryer Lint Screen Alignment Issues
If you’re struggling to insert the lint screen into your Whirlpool dryer, alignment issues may be the culprit. Understanding how the lint screen fits into the dryer is essential for proper functionality and maintenance. This section will explore common alignment problems and provide practical solutions to ensure a seamless fit.
If the lint screen still won’t go in, check for misalignment or damage. A bent or warped screen can hinder proper insertion. This step is crucial to ensure the dryer operates safely.
Inspect the edges of the lint screen for bends.
Check the housing for any obstructions or damage.
Replace the lint screen if any cracks or severe bends are found.
Whirlpool Dryer Vent Maintenance Tips
Proper maintenance of your Whirlpool dryer vent is essential for optimal performance and safety. Regularly checking and cleaning the vent not only enhances drying efficiency but also reduces the risk of fire hazards. This section provides practical tips to help you keep your dryer vent in top condition.
A clogged venting system can also affect the dryer’s performance. Regular maintenance of the venting system is vital for optimal airflow and efficiency.
Disconnect the dryer from the power source.
Remove the vent hose from the back of the dryer.
Use a vent cleaning brush to remove lint buildup.
Whirlpool Dryer Interior Lint Inspection Tips
Inspecting the interior lint of your Whirlpool dryer is crucial for maintaining optimal performance and safety. A buildup of lint can lead to inefficient drying and potential fire hazards. This section offers practical tips for beginners to effectively check and clean the lint buildup inside their dryer, ensuring a smooth and safe operation.
Sometimes, lint can accumulate inside the dryer itself, affecting the overall function. A thorough inspection of the dryer’s interior can reveal hidden issues.
Open the dryer door and remove any visible lint.
Use a flashlight to check inside for additional lint or debris.
Clean the interior with a vacuum or cloth.
Whirlpool Dryer Lint Screen Replacement Steps
Replacing the lint screen in your Whirlpool dryer is a straightforward process that can enhance its efficiency and performance. Understanding the proper steps to remove and install the screen will help you maintain optimal airflow and prevent potential fire hazards. Follow these detailed instructions to ensure a successful replacement.
If cleaning and inspection do not resolve the issue, replacing the lint screen may be necessary. A new screen can restore functionality and improve drying efficiency.
Purchase a compatible lint screen for your Whirlpool model.
Install the new screen by sliding it into the housing.
Test the dryer to ensure proper fit and function.
Recommended Products

Suitable for more than 400 Whirlpool clothes dryers on the market: 7MWED5620HW0,7MWED5620HW1,7MWED6613HC0,7MWED6613HC1,7MWED6613HW0,7MWED6613HW1,7MWED81HEDW0,7MWED90HEFW0,7MWED90HEFW1,7MWED90HEFW2,7MWGD5622HW0,7MWGD5622HW1,7MWGD6620HW0,7MWGD6620HW1,7MWGD6621HC1,7MWGD72HEDW0,7MWGD72HEDW1,7MWGD75HEFW0,7MWGD81HEDW0,7MWGD8620HC1,7MWGD87HEDC0,7MWGD87HEDC1,7MWGD90HEFC0,7MWGD90HEFC1,7MWGD90HEFW0,7MWGD90HEFW1,7MWGD95HEDU0,7MWGD97HDBD0,8TWED5620HW0,8TWED5620HW1,8TWGD5620HW0,8TWGD5620HW2,etc

[IMPORTANT NOTE]: This dryer lint filter and dryer lint catcher is compatible with Whirlpool, Kenmore, Maytag, Amana, Inglis, Roper, Crosley, Estate, Admiral, and Magic Chef, etc.Please check the model number carefully before ordering or send us your dryer model number, and we can help you confirm if it fits or not

【𝗪𝗶𝗱𝗲 𝗖𝗼𝗺𝗽𝗮𝘁𝗶𝗯𝗹𝗲 𝗠𝗼𝗱𝗲𝗹】--- WE03X23881 dryer lint filter replacement for ge dryer 4476390, AP6031713, PS11763056, EAP11763056. Compatible with Hotpoint: HTX21EASK0WW, HTX21GASK0WW, HTX21PASK0WW, HTX24EASK0WW, HTX24GASK0WW, HTX24EASK0WS, HTX24GASK0WS, HTX24GASK1WS, HTX21GASK1WW, HTX26EASW0WW, HTX26GASW0WW
Whirlpool Dryer Lint Screen Cleaning Tips
Keeping your Whirlpool dryer lint screen clean is essential for optimal performance and safety. A clogged lint screen can lead to inefficient drying and even pose a fire hazard. Here are effective cleaning tips to ensure your lint screen remains in top condition, helping you maintain your appliance and improve its longevity.
Preventative maintenance is key to avoiding future issues with the lint screen. Establishing a regular cleaning routine can help keep the dryer functioning smoothly.
Clean the lint screen after each use.
Inspect the venting system every six months.
Schedule professional maintenance annually to ensure all components are functioning properly.
Recommended Products

SUPERIORITY:This is stainless steel(improved version),it is not easy to rust and has a longer service life.Make sure this fits by entering your model number.
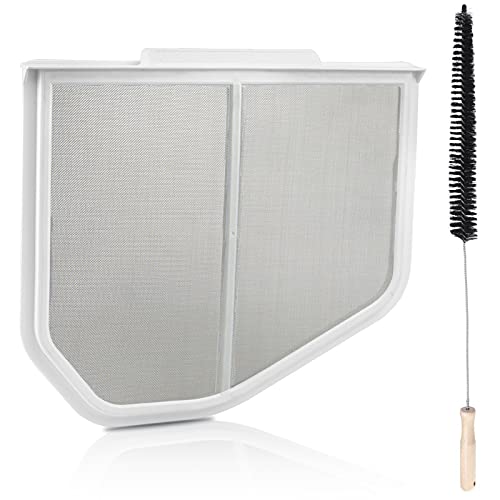
W10120998 8066170 W10049360 Dryer Lint Screen Filter for Whirlpool Maytag Kenmore Replaces W10049370 W10596627 AP3967919 GEQ9800PW2 GEW9200LW1 WED8600YW0 WGD7120HW0 WED9200SQ0 WED8300SW1 GEQ9800PW1 WGD7300XW0 WED9400SW2 WGD8127LW3 MGDZ400TQ1 MGDZ400TQ2 WED7500GC0 WED9500TW0 WED9270XW1 WED5600XW0 WED7400XW0 WED8300SW2 WED9400SW1 MED9600SQ0 MEDE300VW1 110.8772 110.67072600 110.69822801 Kenmore 700/800 Series

PARTS NUMBER:33001808 Dryer Lint Filter Screen.
Whirlpool Dryer Lint Screen Troubleshooting Steps
If your Whirlpool dryer lint screen won’t go in, it can disrupt your laundry routine and lead to potential hazards. Understanding the common issues that cause this problem is essential for effective troubleshooting. The following steps provide a straightforward approach to diagnosing and resolving the lint screen issue, ensuring your dryer operates safely and efficiently.
If the lint screen continues to present issues after following the steps above, further troubleshooting may be needed. Checking for electrical or mechanical failures could reveal deeper problems.
Consult the dryer’s manual for troubleshooting tips.
Contact a professional technician if necessary.
Consider warranty options if the dryer is still under warranty.
Regular maintenance and prompt attention to issues can extend the life of your Whirlpool dryer and ensure optimal performance.

Hey, I’m Jake. I focus on cooling systems at Appliance Mastery, like fridges, freezers, and air conditioners.
I’ve worked in appliance repair for more than ten years and I’m certified through NASTeC. I’ve seen just about every fridge issue you can imagine.
My goal is to help you fix problems without stress. Whether it’s a freezer that won’t cool or an AC that keeps beeping, I’m here to walk you through it.