
Replacing the dryer belt on a Whirlpool model requires specific tools and careful handling to ensure longevity. This process can improve your appliance’s efficiency and extend its lifespan, saving you money on repairs and energy costs.
Whirlpool Dryer Belt Replacement Tools
To successfully replace the dryer belt on your Whirlpool appliance, having the right tools is essential. This section outlines the specific tools you’ll need for the job, ensuring a smooth and efficient replacement process. With the proper equipment, you can enhance the longevity of your dryer and maintain its optimal performance.
Before starting the replacement, ensure you have the right tools and supplies. This preparation will streamline the process and minimize potential issues. The following items are typically needed:
Replacement dryer belt specific to your Whirlpool model
Screwdriver set for removing panels
Socket wrench set for loosening bolts
Safety gloves to protect your hands
Vacuum to clean out lint and debris
| Tool/Supply | Purpose |
|---|---|
| Replacement dryer belt | Direct replacement for the old belt |
| Screwdriver set | To remove screws from the dryer panels |
| Socket wrench set | To loosen and tighten bolts |
| Safety gloves | To protect hands during the process |
| Vacuum | To clean lint and debris |
Recommended Products

100% LIFETIME PROTECTION: Enjoy reliable performance with our lifetime protection, ensuring that your product will always be covered for any defects or issues that may arise.

High-Performance-- Crafted from high-quality sturdy rubber, the 341241 dryer drum drive belt offers exceptional flexibility, strength, and wear resistance for reliable and long-lasting performance

High-Quality Parts: The dryer belts kit is made of premium quality material, and our dryer parts replacement proves extremely durable and highly corrosion-resistant under continuous high-temperature exposure tests. Our 4392065 dryer parts meet or exceed all original manufacturer specifications for fit and performance. They offer the durability you need at a fraction of the cost of other alternatives.
Preparing Your Workspace for Whirlpool Belt Replacement
Before diving into the process of replacing the dryer belt on your Whirlpool appliance, it’s essential to create an organized and safe workspace. A well-prepared area not only enhances efficiency but also minimizes the risk of accidents or misplaced parts. By following these tips, you can ensure a smooth and successful repair experience.
Creating a clean and organized workspace is vital for a successful belt replacement. Ensure you have ample room around the dryer to maneuver. Disconnect the dryer from the power source to avoid electrical hazards.
Clear away any items near the dryer.
Ensure the area is well-lit.
Keep tools within easy reach.
Accessing the Whirlpool Dryer Belt Panels
Accessing the dryer belt panels on your Whirlpool appliance is a crucial first step in replacing the belt effectively. Understanding how to properly open and navigate these panels will not only streamline the repair process but also help maintain the longevity of your dryer. Follow these guidelines to ensure a smooth and efficient access to the belt area.
Accessing the dryer belt requires removing the front or rear panel. This step can vary based on your specific Whirlpool model. Follow these general steps:
Unscrew the screws securing the panel.
Gently pull the panel away from the dryer.
Set the panel aside in a safe location.
Be cautious with the screws; losing them can complicate reassembly.
Remove Whirlpool Dryer Belt Safely
When tackling the task of replacing a dryer belt on your Whirlpool appliance, safety should be your top priority. Understanding the proper techniques for removing the old belt not only ensures your safety but also sets the stage for a successful repair. This section will guide you through the essential steps to safely remove the dryer belt.
Once the panel is removed, locate the drum and the old dryer belt. This step is crucial for ensuring a smooth replacement.
Release tension from the idler pulley.
Slide the belt off the motor pulley and drum.
Inspect the old belt for wear and tear.
If the belt shows signs of fraying or cracking, it is time for a replacement.
Recommended Products
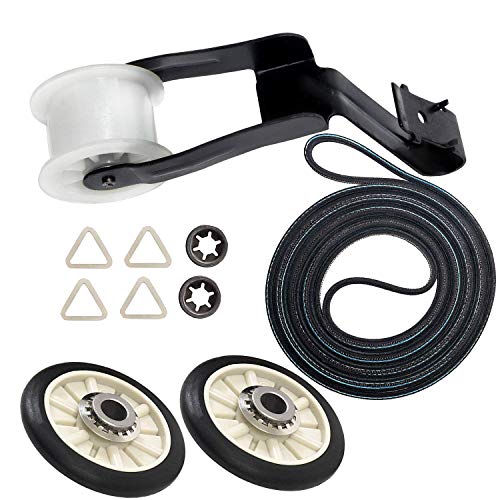
COMPLETE REPAIR KIT: Includes x2 349241T Dryer Rear Drum Support Rollers, x1 691366 Dryer Idler Pulley Assembly, x1 341241 Dryer Drum Belt (1/4" wide, 92 1/4" long, 4 ribs, 3 grooves), x4 Tri-rings, and x2 Clips. The 4392065 Dryer Repair Kit is a direct replacement for part numbers AP3131942, 587636, 4392065, 2014, 26000279435, 26000279436, 279435, 279436, 279708, 279708MS, 279709, 279709MS, 279860, 279948, 4392065VP, 80046, 8106, 8237, 8238, PS373087.

MODEL NUMBER: 341241 Dryer Drum Belt is approximately 1/4" wide x 92-1/4" long. This drum belt is flat and has 4 ribs and 3 grooves.

【High-Quality Parts】: The dryer maintenance kit 4392065 includes: 1 x 341241 whirl-pool Dryer Drum Belt is 92-1/4" long, 1/4" wide, 4 ribs 3 grooves, high quality neoprene material for higher tensile strength,Thickened BeltLonger Lifespan. 1 x 691366 Idler Pulley: thickened metel exceptionally strong, one-piece molding technology durable and long-lasting, 2 x 349241T Roller: reinforced metal bearing smooth and silent, thickened rubber wheel sturdy and wear-resistant
Whirlpool Dryer Belt Installation Steps
Replacing the dryer belt on your Whirlpool appliance can seem daunting, but with the right steps, it becomes a manageable task. This section outlines the essential installation steps to ensure your dryer operates efficiently and lasts longer. Follow these guidelines for a successful belt replacement and to keep your dryer in top condition.
Installing the new dryer belt requires careful handling. Follow these steps to ensure proper installation:
Position the new belt around the drum.
Thread the belt through the idler pulley.
Attach the belt to the motor pulley.
Ensure the belt is properly aligned to avoid future issues.
Recommended Products

279640 Dryer Idler Pulley - Replaces 279640VP, 2958, 3388672, 697692, AP3094197, ER279640, W10468057

𝐏𝐞𝐫𝐟𝐞𝐜𝐭 𝐦𝐚𝐭𝐜𝐡: The W10837240 Dryer Idler Pulley is compatible with various models of these brands: Whirlpool, Kenmore, Maytag, KitchenAid, Amana, Inglis, Crosley, Admiral. It replaces these part numbers: AP5988716, 3387372, 3388674, W10118754, W10118756, W10547287, W10547290, W10837240VP, PS11726337
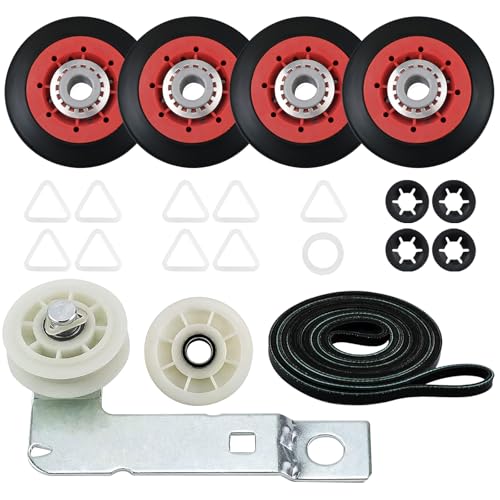
[FIX YOUR DRYER PROBLEMS]: The 4392067 dryer repair kit and W10837240 Dryer Idler Pulley are essential maytag dryer parts designed to address common issues such as noisy operation, non-starting cycles, lack of heat, and drum rotation failures
Reassembling Your Whirlpool Dryer After Belt Replacement
After successfully replacing the dryer belt on your Whirlpool appliance, reassembling the dryer correctly is crucial for optimal performance. This process ensures that all components are securely in place, minimizing the risk of future issues. Follow these detailed steps to ensure your dryer operates smoothly and efficiently for years to come.
After installing the new belt, it is time to reassemble the dryer. This step is essential for restoring the appliance to its original condition.
Reattach the panel using the screws you removed earlier.
Double-check that all screws are tightened securely.
Reconnect the dryer to the power source.
Verify Whirlpool Dryer Belt Installation
Proper installation of the dryer belt is crucial for the efficient operation of your Whirlpool appliance. Ensuring that the belt is correctly positioned not only enhances performance but also extends the lifespan of your dryer. This section will guide you through the verification process to confirm that your dryer belt is installed correctly.
Before considering the job complete, testing the dryer is crucial. This ensures that the new belt is functioning correctly and that there are no other issues.
Run a short cycle to observe the drum’s movement.
Listen for unusual noises that may indicate improper installation.
Check for any vibrations that suggest misalignment.
If everything operates smoothly, you have successfully replaced the dryer belt.
Whirlpool Dryer Maintenance for Longevity
Maintaining your Whirlpool dryer is essential for ensuring its longevity and optimal performance. Regular upkeep not only prevents common issues but also extends the life of components like the dryer belt. This section outlines key maintenance tips to keep your dryer running smoothly and efficiently for years to come.
Proper maintenance can significantly extend the life of your Whirlpool dryer. Regular checks and cleaning can prevent future issues.
Clean the lint filter after every use.
Inspect the belt periodically for wear.
Vacuum the interior of the dryer every few months.
Regular maintenance will help avoid costly repairs and ensure efficient operation.
Whirlpool Dryer Safety Precautions Before Repairs
Before attempting any repairs on your Whirlpool dryer, it’s essential to prioritize safety. Understanding the necessary precautions can help prevent accidents and ensure a smooth repair process. This section outlines key safety measures to keep in mind as you prepare to replace the dryer belt.
Always disconnect the dryer from the power source before starting any repairs. Failure to do so can result in electrical shock or injury.

Hey, I’m Jake. I focus on cooling systems at Appliance Mastery, like fridges, freezers, and air conditioners.
I’ve worked in appliance repair for more than ten years and I’m certified through NASTeC. I’ve seen just about every fridge issue you can imagine.
My goal is to help you fix problems without stress. Whether it’s a freezer that won’t cool or an AC that keeps beeping, I’m here to walk you through it.