
Have you ever hopped in the shower only to be greeted by icy water? If your lower water heater element isn’t getting power, that chilly surprise might become a regular occurrence. It’s a frustrating problem many homeowners face, but you’re not alone.
Key Takeaways
- Understanding Water Heater Components: Familiarity with water heater parts, especially the lower element, aids in diagnosing power issues effectively.
- Common Symptoms of Power Loss: Signs like cold water during showers, inconsistent temperature, and tripped circuit breakers indicate the lower element may not be receiving power.
- Troubleshooting Steps: Inspect electrical connections, check the thermostat, and use a multimeter to ensure the lower water heater element is functioning properly.
- Replacement Process: If the lower element is faulty, proper steps include turning off power, draining the tank, removing the element, and safely installing a new one.
- DIY vs. Professional Help: Consider your experience and comfort level when deciding between DIY repairs and hiring a professional to ensure a safe and effective fix.
- Preventative Maintenance: Regular inspections and understanding power supply requirements will help prevent future issues with your water heater’s lower element.
Understanding Water Heater Components
Understanding the components of your water heater is essential for diagnosing issues like the lower element not getting power. Familiarity with these parts can aid in troubleshooting and maintenance.
Importance of Water Heater Elements
Water heater elements are crucial for heating water. Each water heater typically has one or two elements, either upper or lower. The lower element heats water in the tank for consistent supply during use. If the lower element fails, you may experience cold water in taps and showers. Addressing this issue promptly ensures you maintain a steady hot water supply in your home.
Types of Water Heater Elements
Various types of water heater elements exist, each serving different needs:
- Standard Electric Elements: Common in many residential water heaters, these elements provide efficient heating. Their typical voltage is 240 volts, ensuring rapid water heating.
- Short Electric Elements: Ideal for smaller tanks or compact water heaters. These elements are shorter in length but still offer effective heating capabilities.
- Low-Watt Density Elements: Designed for hard water areas, these elements heat water more slowly but reduce scaling, prolonging the lifespan of the element.
- Flange Elements: Often found in commercial models, flange elements allow for easy replacement. Their design prevents leaks, ensuring reliable operation.
Knowing these types enables you to choose the right replacement if an issue arises with your lower water heater element.
Common Issues with Lower Water Heater Element
The lower water heater element can face several issues that prevent it from getting power. Identifying these problems helps you troubleshoot effectively.
Signs of a Malfunctioning Element
- Insufficient Hot Water: If you notice lukewarm or cold water during showers, the lower element might not be functioning properly.
- Inconsistent Water Temperature: Fluctuations in water temperature while using hot water indicate a potential problem with the element.
- Strange Noises: Unusual sounds, such as popping or rumbling, can suggest sediment buildup or a failing element.
- Tripped Circuit Breaker: If the circuit breaker trips frequently, it could signal an electrical issue affecting the lower element.
- Burnt-Out Element: A broken or burnt-out lower element cannot heat water. Testing continuity with a multimeter confirms this.
- Faulty Thermostat: A malfunctioning thermostat may not send power to the element. Testing it for continuity can determine if it needs replacement.
- Wiring Problems: Damaged or loose wiring can interrupt the electrical flow. Inspecting connections and wiring for wear is crucial.
- Circuit Breaker Issues: A tripped or faulty circuit breaker stops power to the water heater. Resetting or replacing the breaker may restore functionality.
Troubleshooting Steps
Follow these steps to identify why the lower water heater element isn’t getting power.
Recommended Products

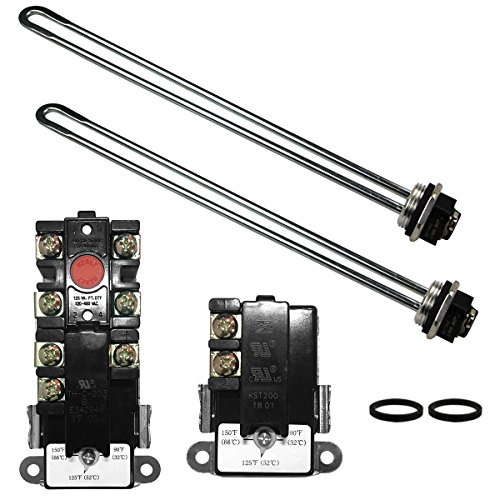
Value Pack: Electric Water Heater Tune-Up Kit includes (2) 2× 13-9/16inch Water Heater Element with Gaskets, (1)Upper Water Heater Thermostat (1) Lower Water Heater Thermostat, (2) Terminal Protective Covers. It's a comprehensive tune-up kit designed to restores the efficiency of your water heater and improves energy consumption

PACKAGE INCLUDES: 1 x Upper water heater Thermostat and 1 x Lower water heater Thermostat,Non-Simultaneous, Temperature adjustment range:90F (32 ℃)~150F (66 ℃).Thermo-O-Disc(TOD)Style, interchangeable with Apcom type thermostats, 120V - 480V

✅ 【Complete All-in-One Repair Kit】 – This plumber's pack includes (2) 4500W 240V copper water heater elements, (1) upper and (1) lower water heater thermostat, (2) protective covers, and (2) element gaskets. It's a comprehensive tune-up kit designed to extend the lifespan of your electric water heater.
Checking Electrical Connections
- Ensure the water heater is turned off. Safety is crucial when working with electrical components.
- Inspect the electrical panel. Look for tripped circuit breakers. If you find one, reset it and check the lower element again.
- Examine wiring connections. Check for loose or corroded connections at the thermostat and lower element terminals. Tighten or replace faulty wires as needed.
- Verify the thermostat setting. Make sure it’s set correctly. If the thermostat is malfunctioning, it can prevent power from reaching the element.
- Shut off the power to the water heater at the circuit breaker.
- Remove the access panel and insulation to expose the lower element.
- Use a multimeter to test resistance. Measure across the terminals of the heating element. A reading between 10 to 16 ohms indicates the element is operating properly. A reading of zero or infinite suggests a faulty element.
- If the element tests faulty, replace it with a new one that matches the specifications of your water heater.
By following these troubleshooting steps, you can efficiently diagnose the issue with your lower water heater element.
Solutions for Repair
You can resolve the issue of the lower water heater element not getting power through several solutions, depending on your comfort level with home repairs. Here are key areas to focus on:
Recommended Products
【ONE YEAR WARRANTY】Z Turn-up Kit Includes (2) 4500W 240V COPPER Water Heater Element, Insert Length: 13-9/16". 3500W@208V. Fit Most Brands of Water Heater >= 30 Gallons.

【Application】Plumber's TOD Style Thermostats Kit provides a quick tune-up to prlong the water heater's life. The Tune-up Kits in Plumber's pack has good compatibility, fitting Most Electric Water Heaters.

LWD UNIVERSAL SCREW-IN WATER HEATER ELEMENT - This screw-in, low watt density-style heating element can be used in most replacement situations of the same wattage and voltage. It reduces lime deposit buildup when used in areas with hard water.
Replacing the Lower Water Heater Element
Replacing a faulty lower water heater element involves a few crucial steps:
- Turn Off Power: Always disconnect the power supply to the water heater at the circuit breaker.
- Drain the Tank: Turn off the water supply and drain the tank to prevent spills. Use a garden hose to direct the water to a suitable drain.
- Remove Access Panel: Unscrew and take off the insulation and access panel to reveal the heating element.
- Disconnect Wires: Carefully disconnect the wires from the old heating element. Labeling them can help during reassembly.
- Unscrew Element: Use a socket wrench to unscrew the element from the tank. Be cautious of any remaining water.
- Install New Element: Thread the new element into place and secure it tightly. Reconnect the wires according to your labels.
- Reassemble and Refill: Replace the access panel and insulation. Turn on the water supply to fill the tank.
- Restore Power: Finally, turn on the circuit breaker to restore power. Allow some time for the water to heat.
By following these steps, you can effectively replace the lower water heater element and restore hot water.
Professional Help vs. DIY Repairs
Determining whether to tackle the repair yourself or call a professional depends on your skills and comfort level. Here’s how to decide:
- Experience: If you’ve done similar repairs before, DIY might save you money. If you lack experience, professional help ensures proper installation and safety.
- Time: Consider how much time you can dedicate to the repair. Professionals can complete the job efficiently.
- Safety Concerns: If unsure about working with electricity or plumbing, opt for a licensed technician. Safety is paramount in handling electrical components.
- Warranty Implications: Consult your water heater’s warranty. Sometimes DIY repairs can void warranties, making professional assistance the safer route.
These factors can guide you in choosing the best approach for your water heater repair needs.
Maintenance Tips to Prevent Future Issues
Regular maintenance ensures your water heater operates efficiently and reduces the risk of the lower element not getting power.
Regular Inspections
Conduct regular inspections to identify potential issues before they escalate. Check the exterior of your water heater for leaks, rust, or corrosion. Inspect wiring connections for signs of wear or looseness. Ensure that the access panel is secure and undamaged. It’s a good idea to perform these inspections every six months. Keeping a maintenance log can help track these inspections and remind you of any repairs needed.
Understanding Power Supply Requirements
Comprehend the power supply requirements for your water heater. Verify that your water heater is connected to the correct voltage. Standard electric water heaters typically operate at 240 volts. Ensure circuit breakers are appropriately sized and functioning. Consider installing a surge protector to reduce the risk of electrical damage. Familiarize yourself with your water heater’s electrical components and consult the manufacturer’s specifications for guidelines to maintain power flow. This knowledge can prevent unforeseen issues down the line and keeps your water heater running smoothly.
Conclusion
Dealing with a lower water heater element that isn’t getting power can be frustrating but you’re not alone in this. By understanding the signs and troubleshooting steps, you can tackle the issue head-on. Whether you choose to repair it yourself or call in a professional, knowing what to look for makes all the difference.
Regular maintenance can help prevent these problems from cropping up in the future. Keep an eye on your water heater’s components and follow the tips shared in this article. With a little effort, you can ensure your home enjoys a steady supply of hot water when you need it most. Happy troubleshooting!
Frequently Asked Questions
Why is my shower only giving cold water?
Cold water in the shower often indicates a problem with the lower element of the water heater not receiving power. This can lead to insufficient hot water or inconsistent temperatures. Checking the power supply and the elements is crucial for resolution.
How can I tell if my water heater element is faulty?
Signs of a faulty water heater element include inconsistent water temperature, insufficient hot water, strange noises, or tripped circuit breakers. Using a multimeter to test the element’s resistance can confirm if it’s working properly, with normal readings between 10 to 16 ohms.
What are the different types of water heater elements?
There are several types of water heater elements, including standard electric, short electric, low-watt density, and flange elements. Each type serves different needs, so understanding the specifications of your water heater is essential when considering replacements.
How do I troubleshoot my water heater?
To troubleshoot, start by turning off the water heater’s power. Check the electrical panel for tripped breakers, inspect wiring for corrosion, and verify thermostat settings. Testing the heating element with a multimeter can help determine if it’s functioning correctly.
Should I replace the water heater element myself?
Replacing a water heater element can be a DIY project if you have some experience with electrical work. However, it’s important to weigh your comfort level, safety concerns, and whether you have the right tools. If in doubt, consider hiring a professional.
What maintenance should I perform on my water heater?
Regular maintenance includes inspecting for leaks, rust, and wiring wear every six months. Keep a log of these inspections and verify voltage connections and circuit breaker sizes. Taking these steps can help prevent future issues and extend the life of your water heater.

Hey, I’m Jake. I focus on cooling systems at Appliance Mastery, like fridges, freezers, and air conditioners.
I’ve worked in appliance repair for more than ten years and I’m certified through NASTeC. I’ve seen just about every fridge issue you can imagine.
My goal is to help you fix problems without stress. Whether it’s a freezer that won’t cool or an AC that keeps beeping, I’m here to walk you through it.