
Understanding the Issue
When your dryer stops working, it can be frustrating. Understanding the issue is the first step to getting it fixed. Here’s how you can tackle this problem:
- Check the Power Supply
- Inspect the Ventilation System
- Test the Thermal Fuse
Check the Power Supply
The most common reason for a dryer not working is a power supply issue. Make sure it’s plugged in and that the outlet is functioning correctly. If the dryer still doesn’t turn on, you may need to check the circuit breaker.
Inspect the Ventilation System
A clogged ventilation system can prevent the dryer from functioning properly. Clean out the lint trap, hose, and vent to ensure proper airflow. This simple maintenance task can often solve the problem.
Test the Thermal Fuse
The thermal fuse is a safety feature that shuts off the dryer if it overheats. If it’s blown, the dryer won’t work. You can test the thermal fuse with a multimeter and replace it if necessary.
By following these steps, you can narrow down the issue and get your dryer up and running again.
Check the Power Source
To address a dryer issue effectively, start by verifying the power source:
- Plug: Ensure the dryer plug is securely inserted into the outlet.
- Power: Confirm the outlet has power; plug in another device to check.
- Circuit Breaker: Check if the circuit breaker hasn’t tripped.
Remember, a faulty power source could be the culprit behind your dryer troubles. Keep these points in mind as you troubleshoot.
Stay tuned for the next steps to get your dryer up and running smoothly.
Inspect the Drum Belt
When your dryer drum is not tumbling, a faulty drum belt could be the culprit. The drum belt is responsible for rotating the drum, allowing your clothes to dry evenly. Inspect the Drum Belt for any signs of wear, tear, or damage.
Here’s what you can do:
- Unplug the dryer before proceeding.
- Locate the drum belt around the drum.
- Check for any fraying, cracks, or looseness in the belt.
- Ensure the belt is aligned and fitted securely around the drum and motor pulley.
If you notice any issues with the drum belt, it may need to be replaced. This can often be done as a DIY project with the right tools and guidance.
Recommended Products

❤PREMIUM QUALITY: The upgraded samsung dryer repair kit made of premium quality material. The rollers are strong and wear-resistant, which make the dryer run stably and quietly. It designed with a high-quality rubber overall structure. The 6602-001655 dryer belt 92’’Length X 0.3’’Width. It is thickness is twice as thick as before and it is more durable. The center of the idler has a triangular design, which is more firm and stable. Meets OEM manufacturing requirements.
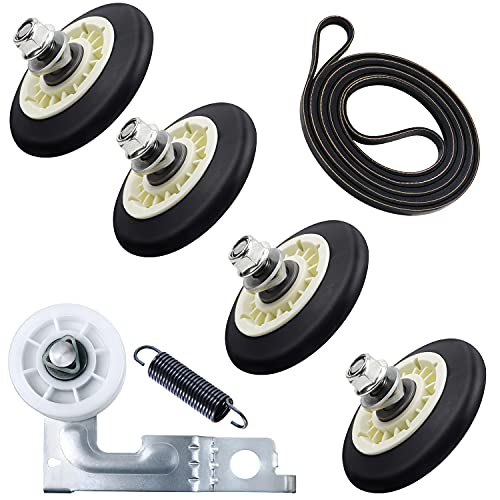
【High-quality upgrade】This dryer repair kit for LG Kenmore includes①1* spring; ②4*4581EL2002C Dryer Drum Roller (using high-quality rubber overall structure design, will not crack, sturdy and durable); ③1* 4561EL3002A Dryer Pulley(it is made of high quality galvanized steel and high strength plastic, wear resistant, sturdy and longevous); ④1*4400EL2001A dryer belt (thickness: 0.12in /3mm. length: 92in. It consists of a non-cracking rubber providing long-lasting wear and durability)
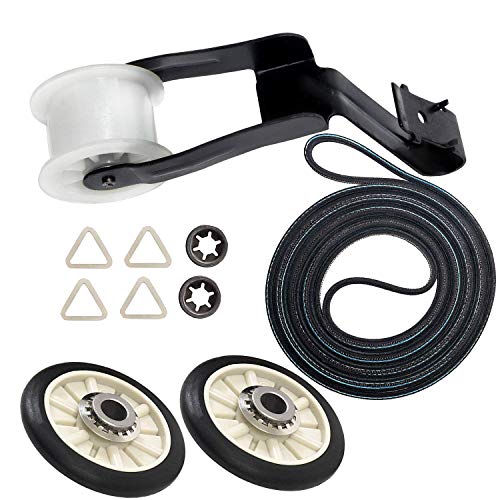
COMPLETE REPAIR KIT: Includes x2 349241T Dryer Rear Drum Support Rollers, x1 691366 Dryer Idler Pulley Assembly, x1 341241 Dryer Drum Belt (1/4" wide, 92 1/4" long, 4 ribs, 3 grooves), x4 Tri-rings, and x2 Clips. The 4392065 Dryer Repair Kit is a direct replacement for part numbers AP3131942, 587636, 4392065, 2014, 26000279435, 26000279436, 279435, 279436, 279708, 279708MS, 279709, 279709MS, 279860, 279948, 4392065VP, 80046, 8106, 8237, 8238, PS373087.
Clear the Ventilation System
When your dryer isn’t drying efficiently, a clogged ventilation system could be the culprit. Here’s what you can do:
- Inspect the Vent Hose: Check for any kinks, bends, or obstructions in the vent hose. Straighten out any twists to ensure proper airflow.
- Clean the Vent: Remove lint buildup by disconnecting the vent from the dryer. Use a vacuum or a vent cleaning brush to clear out debris.
- Check the Vent Opening: Ensure that the vent opening outside your home is free of any blockages like leaves or debris that could hinder airflow.
A clear ventilation system not only improves drying performance but also reduces the risk of fire hazards.
Recommended Products

【All-in-One Dryer Duct Cleaning Kit】No more running to the hardware store for missing parts. This complete vent cleaning kit includes a heavy-duty dryer vent cleaning brush for 4-inch pipes, a set of flexible nylon rods, a dedicated lint brush, a dryer vent cleaner drill attachment, and protective gloves—everything you need in one box, ready to use right away.
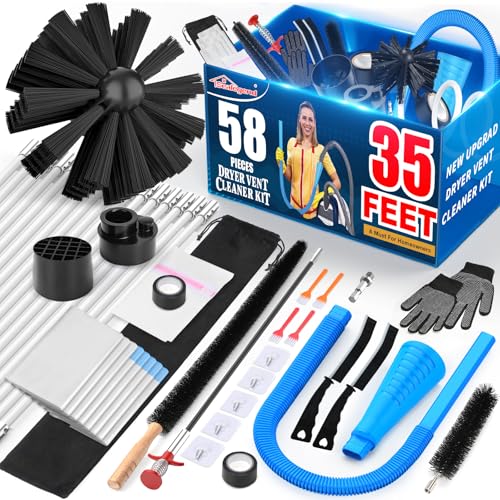
【Efficient dryer cleaning tool set】-Professional cleaning tool set can help you deep clean buildup lint in the dryer. Including 35feet Dryer Vent Brush × 1, Dryer Lint Vacuum Attachment × 1, Lint Trap Brush × 1, Vacuum Cleaner Adapter x1, Dryer Adapter x1, Drill Bit x 1, Multi-Use Lint Cleaner Brush x1, Anti-SLip Gloves x1, Strong Tape x2, Rods Collection Bag x1, Laundry Bag x1, Lint Collection Bag x33, Lint Grabber x1, Blockage Removal Tool x1, Gap Brush x2,MULT-FUNCTIONALCLEANINGBRUSH x4,SELF-ADHECIVEHOOK x5

COMPREHENSIVE DRYER VENT CLEANER KIT: Premium clothes dryer replacement vents will help you deep clean buildup lint in the dryer. Package Includes:DRYER VENT BRUSH HEAD x1,NYLON RODSx1,BLUE LONG VACUUM HOSE(31.5”) x1,BLUE ADAPTER(5.5”)x1,HOSE CONNECTION ACCESSORIER(7.5”) x1,DRYER LINT BRUSH x1,DRYER ADAPTER x1,VACUUM CLEANER ADAPTER x1,GAP CLEANING BRUSH x2, LINT TRAP BRUSH x1,ANTI-SLIP GLOVES x2,LINT GRABBER x1,COLLECTION BAG x1,LAUNDRY BAG x1,STRONG TAPE(FOR NYLON ROD) x2,DUST COLLECTOR BAG x30,DRILL BIT x1,TRANSPARENT SELF-ADHESIVE HOOK x5,SMALL GAP BRUSH x2,GROOVE GAP BRUSH x2
Cleaning the Lint Trap
When it comes to fixing your dryer machine, Cleaning the Lint Trap is a crucial step that can significantly improve its performance. Here’s why it’s important and how you can do it effectively:
Importance of Cleaning the Lint Trap
- A clogged lint trap restricts airflow, making your dryer less efficient.
- Buildup of lint can be a fire hazard if not regularly cleared.
- By keeping the lint trap clean, you help your dryer run smoothly and extend its lifespan.
How to Clean the Lint Trap
- Locate the lint trap, usually found near the dryer door or on top of the machine.
- Remove the lint screen from the trap.
Inspect the screen for any visible buildup of lint.
Use a vacuum cleaner or lint brush to remove lint from the screen.
- Make sure the trap is completely dry before placing it back into the dryer.
Frequency of Cleaning
- It’s recommended to clean the lint trap after every load of laundry.
- Additionally, periodically wash the lint screen with soap and water to remove any residue.
- Improved drying efficiency saves you time and energy.
- Reduces the risk of a dryer fire due to lint buildup.
- Helps maintain the optimal functioning of your dryer over time.
Regularly cleaning the lint trap is a simple yet effective way to ensure your dryer operates safely and efficiently.
Conclusion
That’s it! By following these simple steps to clean your dryer’s lint trap regularly, you can improve its performance and safety. Remember, a clean lint trap means better airflow, reduced fire risks, and a dryer that functions optimally for the long haul. Keep up with this maintenance routine, and you’ll enjoy efficient drying cycles and peace of mind knowing you’re taking care of your appliance. Happy drying!
Frequently Asked Questions
1. Why is it important to clean the lint trap regularly?
Cleaning the lint trap regularly is crucial to maintain dryer performance and safety. A clogged lint trap reduces airflow efficiency and poses a fire hazard if not cleared.
2. How often should I clean the lint trap?
It is recommended to clean the lint trap after every laundry load to ensure optimal dryer performance and safety.
3. What is the best way to clean the lint trap?
To clean the lint trap effectively, remove the lint by hand after each load and periodically wash it with soap and water for thorough maintenance.
4. What are the benefits of cleaning the lint trap?
By maintaining a clean lint trap, users can enhance drying efficiency, reduce fire risks, and ensure the long-term optimal functioning of their dryers.

Hi, I’m Charlie, and I cover all things laundry here at Appliance Mastery.
I’ve spent over eight years working on washing machines, dryers, and dishwashers. I also have a degree in mechanical engineering, which helps me understand how these appliances really work.
I try to make every guide clear and practical. If you’re stuck with a noisy dryer or a leaking washer, I’ll help you figure out what’s wrong and how to fix it.