
A Whirlpool dryer that gets hot but does not dry clothes often indicates a problem with airflow or moisture detection. Common issues include a clogged vent, a malfunctioning thermostat, or a faulty heating element. Addressing these concerns can restore optimal drying performance.
Diagnose Common Whirlpool Dryer Issues
If your Whirlpool dryer is generating heat but failing to dry clothes effectively, several common issues could be at play. Understanding these potential problems is crucial for troubleshooting and ensuring your appliance operates efficiently. This section will help you identify and diagnose the most frequent causes behind this frustrating situation.
Understanding the symptoms can help identify the root cause of the drying issue. A dryer that heats up but fails to dry clothes may exhibit several key symptoms. Recognizing these can streamline the repair process.
| Symptom | Primary Suspect | Difficulty (1-5) |
|---|---|---|
| Dryer heats but clothes remain damp | Clogged vent | 3 |
| Dryer runs but does not heat | Faulty heating element | 4 |
| Clothes take too long to dry | Malfunctioning thermostat | 3 |
| Excess lint buildup | Dirty lint filter | 2 |
Whirlpool Dryer Ventilation System Inspection
A well-functioning ventilation system is crucial for your Whirlpool dryer to effectively dry clothes. If your dryer is getting hot but not drying, inspecting the ventilation system can help identify potential blockages or issues that disrupt airflow. This section will guide you through the steps to ensure your dryer’s ventilation is clear and operating efficiently.
Proper airflow is crucial for effective drying. A blocked vent can trap heat and moisture inside the dryer, preventing clothes from drying. Regular maintenance of the venting system is essential.
Turn off the dryer and unplug it for safety.
Remove the vent hose from the back of the dryer.
Inspect the vent for lint buildup or obstructions.
Use a vacuum or a vent cleaning brush to clear any debris.
Reattach the vent hose and ensure it is secure.
If the vent is clear and the issue persists, further investigation is necessary.
Whirlpool Dryer Lint Filter Impact on Drying
The lint filter in your Whirlpool dryer plays a crucial role in its drying efficiency. When clogged or dirty, it can significantly hinder airflow, leading to inadequate drying performance. Understanding how to maintain and clean the lint filter is essential for ensuring your dryer operates effectively and your clothes come out dry.
A dirty lint filter can significantly impact drying efficiency. Lint buildup restricts airflow, causing the dryer to overheat without effectively drying clothes.
Remove the lint filter from its slot.
Clean the filter with warm, soapy water and a soft brush.
Rinse thoroughly and let it dry completely before reinserting.
Regular cleaning of the lint filter should be part of routine maintenance.
Whirlpool Dryer Thermostat Testing Procedure
When your Whirlpool dryer heats up but fails to dry clothes effectively, the thermostat may be the culprit. Understanding how to test this component is essential for diagnosing the issue accurately. This section outlines a straightforward procedure to evaluate the thermostat’s functionality, helping you restore your dryer’s efficiency.
A malfunctioning thermostat can lead to improper heating cycles. If the thermostat fails to detect moisture levels accurately, it may cause the dryer to stop prematurely.
Access the dryer’s control panel by removing the screws.
Locate the thermostat and disconnect the wires.
Use a multimeter to test for continuity. A reading of zero indicates a faulty thermostat.
Replace the thermostat if necessary.
Ensure the new part is compatible with your specific Whirlpool model.
Recommended Products

HIGH COMPATIBILITY: It is made exactly fit for most top name brands (Whirlpool, Kenmore, Maytag, Roper, Crosley, Inglis, Estate, Amana, KitchenAid, Admiral, Magic Chef) and perfectly fits and replaces original parts so you can easily install it YOURSELF within few minutes. Fits models: [Kenmore] 110.6012990, 110.6012990, 110.76862692, 110.76901690, 110.77834792, 110.796228, 110.97263100, 110.97263800, 110.98762790, 11060012000, 11060012001, 11060012002, 11060022010, 1106012510, etc.
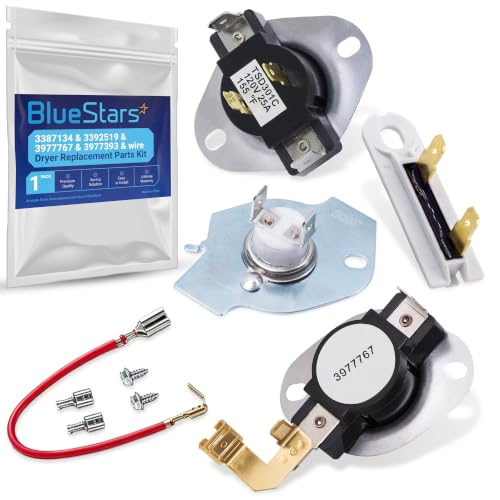
HIGH COMPATIBILITY: It is made exactly fit for most top name brands (Whirlpool, Kenmore, Maytag, Roper, Crosley, Inglis, Estate, Amana, KitchenAid, Admiral, Magic Chef) and perfectly fits and replaces original parts so you can easily install it YOURSELF within few minutes. Fits models: [Kenmore] 110.6012990, 110.6012990, 110.76862692, 110.76901690, 110.77834792, 110.796228, 110.97263100, 110.97263800, 110.98762790, 11060012000, 11060012001, 11060012002, 11060022010, 1106012510, etc.
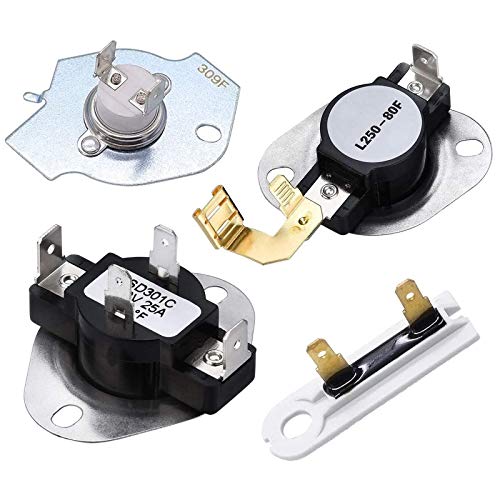
✔✔【ITEM SPECIALITY】:▶ 3387134 WP3387134 dryer cycling thermostat monitors and regulates the temperature inside the dryer. ▶The high-limit thermostat 3977767 WP3977767 shuts off the heating element. ▶The thermal fuse 3392519 WP3392519 (medx655dw1 thermal fuse) shuts off the burner or the motor in an electric dryer. ▶3977393 is a Thermal Fuse Rated at 309 degrees F, it is a one time fuse, if it blows, it will not allow the heat to come back on
Whirlpool Dryer Heating Element Troubleshooting
If your Whirlpool dryer is generating heat but failing to dry clothes effectively, the issue may lie with the heating element. Understanding how to troubleshoot this component is crucial for restoring your dryer’s performance. This section will guide you through the steps to identify and resolve heating element problems, ensuring your laundry routine runs smoothly again.
The heating element is responsible for generating heat in the dryer. If it fails, the dryer may run without producing sufficient heat to dry clothes.
Unplug the dryer and remove the access panel.
Locate the heating element and disconnect the wires.
Test the heating element with a multimeter for continuity.
Replace it if there is no continuity.
This step requires careful handling of electrical components.
Recommended Products

【𝗣𝗘𝗥𝗙𝗘𝗖𝗧 𝗙𝗜𝗧】-- The W10724237 3403585 279838 Dryer heating element kit is compatible with WHIRLPOOL: wed4815ew1, ned4655ew1, wed5000dw2, wed4616fw0, wed5100vq1, wed4950hw0, medx655dw, wed49stbw1, ler8620pg0, medc215ew1, ler7646eq1, wed5300sq0, ler4634eq2, wed5500sq0; MAYTAG: ned4655ew1, medc465hw0, medc215ew1, med7230hw1, medb765fc0, medx655dw1; KENMORE: 70, 80, 90, 300, 400, 500, 600 series models 110 for efficient heating.

✅[QUALITY GROWTH] Excellent heat-proof and abrasion-proof. 2026 UPGRADE 279838 dryer heating element NICKEL-CHROMIUM content reaches 95% and the length of the heating wire is 25% longer than other common dryer replacement parts. So it will last longer than other brand and OEM parts.

Package includes:1 x 279838 dryer heating element,1xWP 3392519 thermal fuse,1 x 3977393 thermal fuse,1 x WP3977767 high limit thermostat,1 x WP3387134 cycle thermostat,NOTE:Disconnect the power before installing this part. Wear work gloves to protect your hands
Whirlpool Dryer Repair Tool Requirements
When tackling issues with a Whirlpool dryer that gets hot but fails to dry clothes, having the right tools is essential for effective troubleshooting and repair. This section outlines the specific tools needed to diagnose and fix common problems, ensuring you can restore your dryer’s functionality efficiently. Equip yourself with the necessary equipment to tackle these repairs confidently.
Before starting repairs, gather the necessary tools and supplies to ensure a smooth process. Having everything on hand can save time and frustration.
| Tool/Supply | Purpose |
|---|---|
| Screwdriver set | To remove panels |
| Multimeter | To test electrical components |
| Vacuum cleaner | To clear lint from vents |
| Vent cleaning brush | To remove obstructions |
| Replacement parts | For faulty components |
Whirlpool Dryer Safety and Preparation Tips
Before troubleshooting your Whirlpool dryer, it’s essential to prioritize safety and proper preparation. Understanding the necessary precautions can help prevent accidents and ensure efficient repairs. This section outlines key steps to take before diving into any maintenance or troubleshooting tasks, ensuring a safe and effective approach to resolving drying issues.
Safety is paramount when working on electrical appliances. Follow these guidelines to ensure a safe repair environment.
Unplug the dryer before starting any repairs.
Wear safety goggles to protect your eyes from debris.
Use gloves to avoid cuts from sharp edges.
Whirlpool Dryer Repair Steps for Drying Issues
If your Whirlpool dryer is generating heat but failing to dry clothes effectively, it can be frustrating. This section outlines essential repair steps to troubleshoot and resolve common drying issues, ensuring your appliance operates efficiently and your laundry comes out perfectly dry. Follow these guidelines to tackle the problem systematically and restore your dryer’s performance.
Follow these steps systematically to address the drying issue. Each repair should be approached methodically to ensure nothing is overlooked.
Inspect the venting system for blockages.
Clean the lint filter thoroughly.
Test the thermostat and replace if faulty.
Evaluate the heating element and replace if necessary.
Each of these steps plays a crucial role in restoring the dryer’s functionality.
Recommended Products

High-Quality Parts: The dryer belts kit is made of premium quality material, and our dryer parts replacement proves extremely durable and highly corrosion-resistant under continuous high-temperature exposure tests. Our 4392065 dryer parts meet or exceed all original manufacturer specifications for fit and performance. They offer the durability you need at a fraction of the cost of other alternatives.

GENUINE OEM QUALITY: Whirlpool Genuine OEM dryer maintenance kit is engineered for compatible dryers to help support proper fit, reliable operation, and the performance standards your appliance was designed to deliver

【High-Quality Parts】: The dryer maintenance kit 4392065 includes: 1 x 341241 whirl-pool Dryer Drum Belt is 92-1/4" long, 1/4" wide, 4 ribs 3 grooves, high quality neoprene material for higher tensile strength,Thickened BeltLonger Lifespan. 1 x 691366 Idler Pulley: thickened metel exceptionally strong, one-piece molding technology durable and long-lasting, 2 x 349241T Roller: reinforced metal bearing smooth and silent, thickened rubber wheel sturdy and wear-resistant
Whirlpool Dryer Further Troubleshooting Steps
If your Whirlpool dryer is generating heat but failing to dry clothes effectively, further troubleshooting may be necessary to identify the underlying issue. This section outlines additional steps you can take to diagnose and resolve common problems that could be affecting your dryer’s performance. By following these guidelines, you can ensure your appliance operates efficiently and effectively.
If the dryer continues to malfunction after addressing the primary issues, consider these additional troubleshooting steps.
Check the power supply to ensure the dryer is receiving adequate voltage.
Examine the door switch to confirm it is functioning properly.
Assess the control board for any signs of damage or malfunction.
These components can also impact the overall performance of the dryer.
Whirlpool Dryer Performance Verification Steps
When your Whirlpool dryer heats up but fails to dry clothes, it can be frustrating and perplexing. This section outlines essential performance verification steps to help diagnose the issue effectively. By following these guidelines, you can identify potential problems and ensure your dryer operates at its best.
After completing repairs, run a test cycle to verify that the dryer is functioning correctly. Monitor the drying performance closely. If problems persist, consulting a professional technician may be necessary.

Hey, I’m Jake. I focus on cooling systems at Appliance Mastery, like fridges, freezers, and air conditioners.
I’ve worked in appliance repair for more than ten years and I’m certified through NASTeC. I’ve seen just about every fridge issue you can imagine.
My goal is to help you fix problems without stress. Whether it’s a freezer that won’t cool or an AC that keeps beeping, I’m here to walk you through it.