
Replacing the drum bearing in a Whirlpool washing machine can restore smooth operation and eliminate excessive noise during cycles. This DIY tutorial will guide you through the necessary steps for a successful replacement, ensuring your appliance functions efficiently.
Whirlpool Washing Machine Drum Bearing Failure Signs
Identifying the signs of drum bearing failure in your Whirlpool washing machine is crucial for maintaining its performance and longevity. This section highlights the key indicators that suggest your drum bearings may need replacement, allowing you to address issues promptly and avoid more extensive damage. Recognizing these symptoms early can save you time and money in repairs.
Recognizing the signs of drum bearing failure is crucial for timely intervention. Common symptoms include loud noises during operation, excessive vibrations, and leaking water. Addressing these issues promptly can prevent further damage to your washing machine.
| Symptom | Primary Suspect | Difficulty (1-5) |
|---|---|---|
| Loud grinding noise | Worn drum bearing | 3 |
| Excessive vibrations | Damaged drum bearing | 4 |
| Water leaks | Faulty seal | 2 |
Whirlpool Washer Bearing Replacement Tools
When tackling the replacement of a drum bearing in a Whirlpool washing machine, having the right tools is essential for a smooth and efficient process. This section highlights the specific tools you’ll need to successfully complete the task, ensuring you are well-prepared before diving into the DIY repair.
Before starting the replacement process, ensure you have all necessary tools and supplies ready. This preparation will streamline your work and minimize downtime. Here’s what you will need:
Socket set for removing screws
Screwdriver for disassembling components
Pry bar for lifting the drum
Replacement drum bearing specific to your Whirlpool model
Grease for lubrication
Whirlpool Washer Safety and Preparation Steps
Before diving into the drum bearing replacement process for your Whirlpool washing machine, it’s crucial to prioritize safety and proper preparation. Ensuring your workspace is organized and taking necessary precautions will not only protect you but also facilitate a smoother repair experience. This section outlines essential steps to set you up for success.
Safety is paramount when working on appliances. First, unplug the washing machine to eliminate any electrical hazards.
Next, remove the back panel to access the drum assembly. This step may require a socket set to remove screws.
Disconnect the water hoses from the back.
Remove the drain hose from the standpipe.
Tilt the machine for easier access to the drum.
Recommended Products
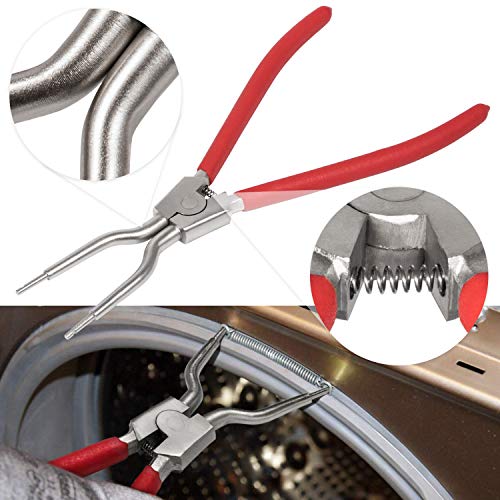
Great Compatibility — Compatible with LG, Samsung, Whirlpool, Kenmore and all brand front-load washing machines with the Spring Body Length ranging from 2.0 to 3.5 inches. Fit for 4986ER0004F/B/G Door Boot. Replacement for LG and Samsung OEM part number 383EER4001A, 383EER4004A, TJTSE-1, 1268535, AH3569695, AP4438623, EA3569695, EAP3569695, PS3569695.

✔✔【THREE YEAR GUARANTEE】— The item 383EER4004A Washer Spring Removal Tool supports 3 YEAR after-sales service.Our company attaches great importance to the shopping experience of each customer.Risk-free shopping, If you have any quality problem during guarantee period, please contact customer service in time. We will try our best to solve the problem. Customer satisfaction is our tireless pursuit
Whirlpool Drum Bearing Replacement Instructions
Replacing the drum bearing in your Whirlpool washing machine can seem daunting, but with the right guidance, it becomes a manageable DIY project. This section provides clear, step-by-step instructions to help you successfully complete the replacement, ensuring your washer operates smoothly and efficiently once again. Follow these detailed directions to tackle the task with confidence.
Follow these steps to replace the drum bearing effectively. Each step is crucial for ensuring proper installation and functionality.
Remove the drum by unscrewing the bolts holding it in place.
Lift the drum out carefully, using a pry bar if necessary.
Inspect the old bearing for wear and tear.
Clean the bearing housing thoroughly to remove debris.
Insert the new drum bearing into the housing.
Lubricate the bearing with grease to ensure smooth operation.
Reassemble the drum by reversing the disassembly steps.
Recommended Products

Replace bearing kit coulld effectively reduce the noise of cabrio washer machine, solve shaking problems

✔ Replacement - 4036ER2004A, 4036ER4001B, 4280FR4048E and 4280FR4048L.

Anti-vibration and Anti-Slip Pads: CUISIBOT anti vibration pads for washing machine are designed to lift your washing machine up to about 1.8 inch, and absorb the shock,noise, stop shaking moving at the same time. Solve the problem of difficult drainage and cleaning. NOTE: This product is ONLY for vibration reduction and height adjustment. Does NOT include ventilation parts.
Whirlpool Washing Machine Post-Replacement Testing
After replacing the drum bearing in your Whirlpool washing machine, it’s essential to conduct thorough testing to ensure everything is functioning correctly. This section outlines the key steps to verify the repair, helping you identify any potential issues before putting your machine back into regular use. Proper testing can save you from future headaches and ensure optimal performance.
After replacing the drum bearing, it’s important to test the washing machine for any lingering issues. If you notice persistent noise or vibrations, consider the following:
Check if the drum is seated properly.
Ensure all screws are tightened securely.
Inspect for any loose components that may cause rattling.
Whirlpool Washing Machine Maintenance Tips
Maintaining your Whirlpool washing machine is essential for its longevity and performance. Regular upkeep can prevent common issues, including drum bearing wear, and ensure your appliance runs smoothly. This section offers practical tips to help you keep your washing machine in top condition, minimizing the need for repairs and enhancing its efficiency.
Proper maintenance can extend the life of your washing machine. Regularly inspect the drum bearings and other components for wear. Consider the following maintenance tips:
Clean the drum regularly to prevent buildup.
Inspect hoses for leaks or cracks.
Level the machine to avoid vibrations during cycles.
Whirlpool Drum Bearing Safety Precautions
When replacing the drum bearing in your Whirlpool washing machine, safety should be your top priority. Understanding the necessary precautions can help prevent accidents and ensure a smooth repair process. This section outlines essential safety measures to follow before you begin your DIY project.
Always ensure the washing machine is unplugged before performing any repairs.
Whirlpool Drum Bearing Replacement Steps
Replacing the drum bearing in your Whirlpool washing machine can seem daunting, but with the right guidance, it becomes an achievable DIY task. This section outlines the essential steps to successfully replace the drum bearing, ensuring your washing machine operates smoothly and efficiently once again. Follow these instructions carefully to tackle the repair with confidence.
Replacing the drum bearing in your Whirlpool washing machine can significantly improve its performance. Follow the outlined steps carefully and maintain your appliance regularly to prevent future issues.

Hey, I’m Jake. I focus on cooling systems at Appliance Mastery, like fridges, freezers, and air conditioners.
I’ve worked in appliance repair for more than ten years and I’m certified through NASTeC. I’ve seen just about every fridge issue you can imagine.
My goal is to help you fix problems without stress. Whether it’s a freezer that won’t cool or an AC that keeps beeping, I’m here to walk you through it.