
Replacing the pulley on a Whirlpool dryer is a straightforward process that can restore functionality and efficiency. This guide provides step-by-step instructions to help you complete the task without professional assistance.
Essential Tools for Whirlpool Dryer Pulley Replacement
Before embarking on the process of replacing the pulley on your Whirlpool dryer, it’s important to gather the right tools. Having the essential equipment at hand will streamline the repair and ensure a successful outcome. This section outlines the specific tools you’ll need to tackle this DIY project effectively.
Before starting the replacement, collect the necessary tools and supplies. Having everything on hand will streamline the process and minimize interruptions.
Essential tools include:
Screwdriver set (both Phillips and flathead)
Socket wrench
Pliers
Replacement pulley
Belt (if needed)
Safety gloves
Recommended Products
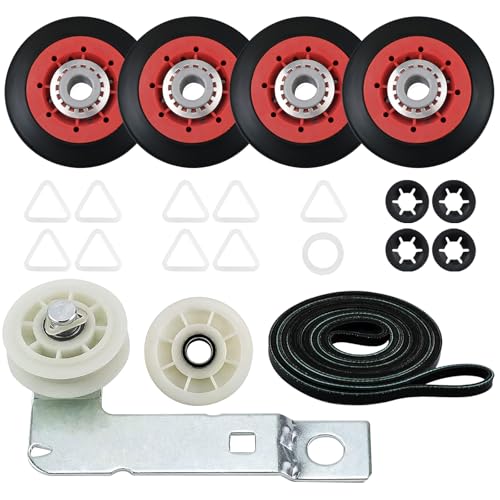
[FIX YOUR DRYER PROBLEMS]: The 4392067 dryer repair kit and W10837240 Dryer Idler Pulley are essential maytag dryer parts designed to address common issues such as noisy operation, non-starting cycles, lack of heat, and drum rotation failures
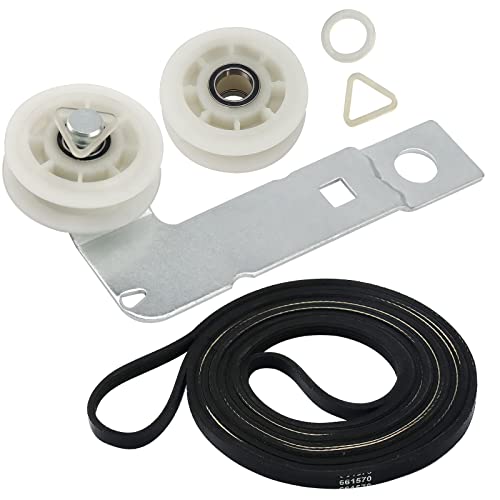
DRYER DRUM BELT KIT : 661570 Dryer Drive Belt is 93 1/2 inches long, and 1/4 of an inch wide, with 4 ribs and 3 grooves on the inside to ensure a better grip and a smooth operation. Drum belt 661570V transmits power from the motor to the drum roller,causing the drum to rotate. 661570 dryer belt is made of upgraded rubber, which makes 661570V belt less likely to break even after long-term use. 279640 Dryer Idler Pulley maintains the right amount of tension for the belt to rotate the drum. W10837240 Idler Pulley for dryers maintains correct tension on the drive belt to spin the drum. Upgraded idler gear's ball bearings ensure that the pulley operates more smoothly

279640 Dryer Idler Pulley - Replaces 279640VP, 2958, 3388672, 697692, AP3094197, ER279640, W10468057
Whirlpool Dryer Safety and Workspace Setup
Before diving into the process of replacing the pulley on your Whirlpool dryer, it’s essential to prioritize safety and ensure your workspace is properly set up. Taking the time to prepare will help you avoid accidents and make the repair more efficient. This section will guide you through the necessary safety precautions and workspace arrangements for a successful DIY project.
Creating a safe and organized workspace is crucial for any DIY project. Ensure the dryer is unplugged to avoid any electrical hazards. Clear the area around the dryer to allow for easy access.
Follow these safety precautions:
Wear safety gloves to protect your hands.
Use safety goggles to shield your eyes from debris.
Keep the workspace dry and free from clutter.
Removing Whirlpool Dryer Front Panel Steps
To successfully replace the pulley on your Whirlpool dryer, it’s essential to start by removing the front panel. This step is crucial as it provides access to the internal components, allowing you to reach the pulley easily. Follow these detailed steps to ensure a smooth disassembly process and prepare for the replacement.
To access the pulley, you need to remove the front panel of the dryer. This step may vary slightly depending on your specific Whirlpool model.
Unplug the dryer to ensure safety.
Detach the lint filter and remove any screws securing the front panel.
Carefully lift the front panel away from the dryer.
Removing the Old Whirlpool Dryer Pulley
Replacing the pulley on your Whirlpool dryer can seem daunting, but with the right approach, it becomes a manageable DIY task. This section will guide you through the process of safely removing the old pulley, ensuring you have the necessary steps to proceed with your dryer repair confidently and efficiently.
With the front panel removed, you can now access the old pulley. This step is critical for ensuring the new pulley is installed correctly.
Locate the pulley assembly.
Use a socket wrench to remove any bolts securing the pulley.
Carefully detach the old pulley from the dryer.
Whirlpool Dryer Pulley Installation Steps
Replacing the pulley on your Whirlpool dryer can seem daunting, but with the right guidance, it becomes a manageable DIY task. This section outlines the essential steps to ensure a successful installation, enabling you to restore your dryer’s functionality efficiently. Follow these instructions carefully to navigate the process with confidence.
Installing the new pulley is a straightforward process that requires attention to detail. Ensure the new part is compatible with your Whirlpool dryer model.
Position the new pulley in place.
Secure it using the bolts removed earlier.
Ensure it spins freely without obstruction.
Whirlpool Dryer Reassembly Steps
Reassembling your Whirlpool dryer after replacing the pulley is a crucial step to ensure it functions correctly. This section will guide you through the necessary steps to put everything back together safely and efficiently, allowing you to restore your dryer to working order without any hassle. Follow these instructions carefully for a successful reassembly.
After installing the new pulley, it is time to reassemble the dryer. This step ensures that everything is back in its original position.
Reattach the front panel by aligning it with the dryer frame.
Secure it with screws removed earlier.
Replace the lint filter.
Verify Whirlpool Dryer Operation After Repair
After replacing the pulley on your Whirlpool dryer, it’s crucial to ensure that the appliance operates correctly. This step involves checking for any unusual noises, verifying the drum spins smoothly, and confirming that the drying cycle functions as intended. Following these checks will help ensure your repair was successful and that your dryer is back to optimal performance.
After reassembly, testing the dryer is essential to confirm the repair was successful.
Plug the dryer back in.
Set it to a drying cycle and observe its operation.
Listen for any unusual noises that may indicate a problem.
Whirlpool Dryer Pulley Replacement Issues
When tackling pulley replacement on a Whirlpool dryer, several common issues can arise that may complicate the process. Understanding these potential challenges is crucial for a smooth repair experience. This section delves into the typical problems encountered during pulley replacement and offers insights on how to effectively address them.
Sometimes, issues may arise even after replacing the pulley. Understanding common problems can help you address them quickly.
| Symptom | Possible Cause | Solution |
|---|---|---|
| Dryer makes loud noises | Worn bearings | Replace bearings |
| Dryer does not spin | Loose belt | Tighten or replace belt |
| Clothes take too long to dry | Blocked vent | Clean vent system |
Whirlpool Dryer Maintenance Best Practices
Maintaining your Whirlpool dryer is essential for ensuring its longevity and optimal performance. Regular upkeep not only prevents costly repairs but also enhances efficiency. This section outlines best practices to keep your dryer running smoothly, helping you avoid common issues and extend the life of your appliance.
Regular maintenance can prolong the life of your Whirlpool dryer and prevent future issues.
Clean the lint filter after every use.
Inspect the venting system for blockages regularly.
Check the pulley and belt for wear every few months.
Whirlpool Dryer Pulley Replacement Steps
Replacing the pulley on your Whirlpool dryer can seem daunting, but with the right guidance, it becomes a manageable DIY task. This section outlines the essential steps to successfully replace the pulley, ensuring your dryer operates smoothly and efficiently once again. Follow these instructions carefully to restore your appliance with confidence.
Completing the replacement of the pulley on your Whirlpool dryer involves careful attention to detail and safety. Always ensure you have the right tools and parts before starting the process. Regular maintenance will help keep your dryer running efficiently.

Hey, I’m Jake. I focus on cooling systems at Appliance Mastery, like fridges, freezers, and air conditioners.
I’ve worked in appliance repair for more than ten years and I’m certified through NASTeC. I’ve seen just about every fridge issue you can imagine.
My goal is to help you fix problems without stress. Whether it’s a freezer that won’t cool or an AC that keeps beeping, I’m here to walk you through it.