
- Diagnostic mode is a useful tool for troubleshooting issues with your GE dishwasher.
- To enter diagnostic mode, press the Start/Reset button and hold it down for 5 seconds.
- Once in diagnostic mode, you can use the cycle select buttons to navigate through the different tests available.
- The tests will vary depending on your specific model of GE dishwasher, but may include tests for water fill, wash motor operation, and drain pump function.
- You can exit diagnostic mode at any time by pressing the Start/Reset button or by simply waiting for 90 seconds without making any selections.
Are you having trouble with your GE dishwasher? Do you suspect there’s an issue, but you’re not quite sure what it is or how to fix it? If so, you’re not alone. Many people struggle with the same problem. But fear not! There is a solution.
Putting your GE dishwasher in diagnostic mode can help identify any problems and provide helpful error codes to determine what needs fixing. This is especially helpful for those who are DIY-savvy and want to avoid the hassle of calling in a repair technician. However, accessing diagnostic mode on your GE dishwasher may seem like a daunting task at first, causing frustration and stress.
Don’t worry – we’ve got you covered! In this article, we’ll walk through step-by-step instructions on how to put your GE dishwasher in diagnostic mode. Whether you’re dealing with a clog, faulty pump or motor, or any other issue causing unwanted downtime for your appliance – this guide will be the answer to all of your problems.
The Quick Answer:
Using diagnostic mode on a GE dishwasher can help diagnose and troubleshoot issues, saving time and money on repairs. It can also identify general cleaning or maintenance needs for your appliance. Accessing diagnostic mode varies by model, but involves turning off the dishwasher and following a specific button sequence to enter. Once entered correctly, the control panel will display relevant information about the dishwasher’s state.
Why Use Diagnostic Mode on a GE Dishwasher?
Diagnostic mode is a feature in modern GE dishwashers that helps to diagnose and troubleshoot any issues that the dishwasher may be having. It is an excellent tool for identifying problems with your dishwasher, which can save you time and money on repairs. By accessing diagnostic mode, you can get detailed error codes and other information about what is going wrong with your appliance.
In addition to diagnosing specific issues, diagnostic mode can also help you identify general cleaning or maintenance needs for your dishwasher. For example, it can provide information about the state of various filters or sensors that may need attention.
Using diagnostic mode on your GE dishwasher is not difficult, but it does require following some specific steps. It is essential to note that not all GE models have the same instructions for entering diagnostic mode. Therefore, it’s crucial to ensure you follow the instructions provided in your manual or online resources carefully.
Accessing Diagnostic Mode on Your Specific Model of GE Dishwasher
The process of accessing diagnostic mode will vary depending on the model of your GE dishwasher. However, there are some basic steps that apply to most models.
First, turn off the dishwasher by pressing the power button until it goes off completely. Next, wait for a few seconds before starting the process again.
The Button Sequence to Enter Diagnostic Mode on a GE Dishwasher
Once you have turned off your GE dishwasher and waited for a few seconds, follow these steps:
- Press and hold the start button while simultaneously pressing and holding the heated dry button.
- Release both buttons simultaneously.
- Press the start button once more.
- You should hear a beep sound indicating that you’ve entered diagnostic mode.
After entering this sequence correctly, your control panel will display information relevant to your dishwasher’s current status.
Information Displayed on the Control Panel During Diagnostic Mode
Once successfully entered into diagnostic mode, you will see a series of codes and other information displayed on your GE dishwasher control panel. The codes are essential in identifying the issue with your appliance.
The display typically shows the specific error code or fault that has been identified by the machine. This could be anything from a problem with the motor to issues with sensors or filters.
In general, most GE dishwasher models provide detailed information about what is wrong with the appliance, making it easier for you to identify and fix issues quickly.
Interpreting Error Codes in GE Dishwasher Diagnostic Mode
The error codes displayed during diagnostic mode may vary depending on your model of GE dishwasher. However, these codes generally follow some similar patterns.
To interpret an error code correctly, it’s important to check your user manual or online resources for information about what each code means. You should also consult with a professional repair service if you’re uncertain about what any particular error code represents.
Common Error Codes Found in GE Dishwashers
Here are some of the common error codes found in most models of GE dishwashers:
- Error Code 1: Indicates that there is a leak somewhere in the machine.
- Error Code 2: Indicates a failure in the water inlet valve or other related components.
- Error Code 3: Indicates problems related to temperature sensors or heating elements.
- Error Code 4: Indicates a malfunctioning wash pump motor or its associated parts.
Common Issues Identified Through GE Dishwasher Diagnostic Mode
Diagnostic mode can help identify many common issues that people face when using their GE dishwashers. Some of these issues include clogged filters, malfunctioning pumps, and other mechanical issues that may prevent your dishwasher from working correctly.
Using diagnostic mode to identify these types of problems can help you save money by making repairs before they become more severe. It’s also a great way to ensure that your dishwasher is always running at peak performance.
Some Common Issues That Diagnostic Mode Can Identify Include:
- Clogs in the spray arm or filters
- Problems with the pump, motor, or wiring
- Faulty thermostats or temperature sensors
- Issues with water inlet valves or hoses.
Making Adjustments and Repairs in GE Dishwasher Diagnostic Mode
Once you have identified the issue with your dishwasher through diagnostic mode, it’s time to make adjustments or repair any faulty components. Depending on the issue, this may require replacing parts like pumps or motors, unclogging filters or hoses, or addressing other mechanical problems.
It’s essential to follow the instructions provided in your user manual for repairing your GE dishwasher appropriately. In some cases, it may be necessary to call a professional repair service if you’re uncertain about what needs to be done.
Resetting Your GE Dishwasher After Completing Diagnostic Mode
After completing any repairs or adjustments required through diagnostic mode, you need to reset your GE dishwasher to exit from diagnostic mode. To do this:
- Press the “Start/Reset” button once.
- The control panel will beep once indicating that you have successfully exited diagnostic mode.
- You can now turn off the power supply and restart your dishwasher as usual.
It’s important to note that resetting your GE dishwasher after exiting diagnostic mode helps ensure that any changes made are saved properly.
Accessing Diagnostic Mode on Your Specific Model of GE Dishwasher
Recommended Products
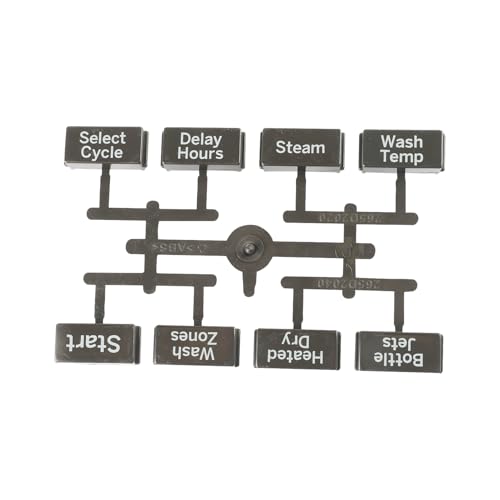
☆ WD09X22799 Dishwasher Button & Graphics Made Exactly to Fit For Most Top Brand Dishwashers
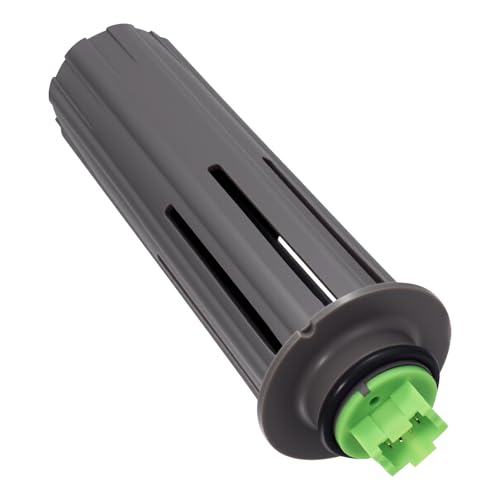
【FIXES TOP 3 DISHWASHER ISSUES】Replace your faulty WD21X10519 flood switch to resolve water overflow, incomplete cycles, and no-heat drying issues. This integrated thermistor assembly precisely monitors water levels and temperature signals to the control board—restoring proper fill, drain, and heating functions to your GE dishwasher without costly technician visits
Check the Manual First
Before attempting to enter diagnostic mode, it is important to consult your dishwasher manual. Different models may have different button sequences or require different steps altogether. Make sure you are following the correct instructions for your specific model.
Identify the Control Panel
To access diagnostic mode, you must first locate the control panel on your GE dishwasher. This is usually located on the front of the machine and can be identified by a series of buttons and display screens.
Follow Button Sequence Instructions Carefully
Once you have located the control panel, follow the button sequence instructions carefully. Depending on your model, this may involve holding down certain buttons or pressing them in a specific order. It is important to follow these instructions exactly as they are given to avoid damaging your dishwasher.
The Button Sequence to Enter Diagnostic Mode on a GE Dishwasher
Button Sequence Example:
1. Start by pressing “Heated Dry” and “Normal Wash” simultaneously.
2. Release both buttons.
3. Press “Start” once.
4. Wait for the display screen to change before proceeding.
Note that this sequence may vary depending on your specific model of GE dishwasher.
Information Displayed on the Control Panel During Diagnostic Mode
Diagnostic Mode Display Information:
When you enter diagnostic mode, several pieces of information will be displayed on the control panel screen. This typically includes error codes, cycle status, and other diagnostic information specific to your model of GE dishwasher.
Cycle Status Information:
Cycle status information will show which part of the wash cycle your dishwasher is currently in, such as prewash or main wash.
Error Codes:
Error codes can be displayed during diagnostic mode to help identify any issues with your dishwasher. These codes can be used to troubleshoot problems and make necessary repairs.
Interpreting Error Codes in GE Dishwasher Diagnostic Mode
Common Error Codes:
Some common error codes that may appear during GE dishwasher diagnostic mode include:
– E1: Water supply issue
– E2: Water drain issue
– E3: Heating element issue
– E4: Overflow or water leak detected
If you receive an error code during diagnostic mode, consult your manual for further information on how to troubleshoot and resolve the issue.
Common Issues Identified Through GE Dishwasher Diagnostic Mode
Drainage Issues:
One of the most common issues identified through GE dishwasher diagnostic mode is a problem with drainage. This may be caused by a clogged filter, a malfunctioning pump, or other issues.
Heating Element Problems:
Another common issue is problems with the heating element. This may cause your dishwasher to not heat up properly, resulting in unclean dishes at the end of the cycle.
Making Adjustments and Repairs in GE Dishwasher Diagnostic Mode
Troubleshooting Tips:
If you identify an issue with your GE dishwasher through diagnostic mode, there are several troubleshooting tips you can try before resorting to calling a repair technician:
– Clean out filters and remove any debris from inside the dishwasher.
– Check for kinks or obstructions in the drainage hose.
– Test the heating element for continuity using a multimeter.
– Replace any damaged or worn parts as needed.
Always follow proper safety procedures when making adjustments or repairs to your dishwasher.
Resetting Your GE Dishwasher After Completing Diagnostic Mode
Button Sequence Example:
1. Press “Heated Dry” and “Normal Wash” simultaneously.
2. Release both buttons.
3. Press “Cancel/Drain” once.
4. Wait for the dishwasher to reset before attempting to run a new cycle.
Note that this sequence may vary depending on your specific model of GE dishwasher.
In conclusion, putting a GE dishwasher in diagnostic mode can be done easily by following the manufacturer’s instructions. It is an important step in troubleshooting and identifying any potential issues with the appliance.
Frequently Asked Questions about How Do I Put My GE Dishwasher in Diagnostic Mode
How do you reset the service mode on a GE dishwasher?
To activate the service mode on the dishwasher, press and hold the Select Cycle and Start buttons for five seconds. To reset the dishwasher, hold the Select Cycle button for another five seconds, which will activate the lock button light. Finally, press the Select Cycle button once more for five seconds.
How do you reset a GE dishwasher that won’t start?
To reset the dishwasher, press the “Start/Reset” pad and wait for 2 minutes. If the issue persists, do a complete reset of the dishwasher by switching off the power to the unit at the house circuit breaker or fuse box for approximately 30 seconds. Turn the power back on and the dishwasher should reset and operate as usual.
How do I reset my dishwasher panel?
Typically, dishwashers do not feature a specific button for resetting on their control panels. However, you can reset your dishwasher by disconnecting it from its power supply for 60 seconds and then reconnecting it.
How do you force cancel and drain a GE dishwasher?
To reset the dishwasher, find the reset button near the power cord and press and hold it for 5 seconds. During this time, the “Start/Reset” light will blink as the water drains out, which typically takes around two minutes.
Why is my GE dishwasher not draining at the end of the cycle?
When a dishwasher fails to drain, it could be due to either a blocked or kinked drain hose. The initial step is to inspect the hose for kinks. If it is not kinked, look for any obstructions in the drain hose. This process is recommended as of November 2, 2021.
How do you reset the control board on a GE washer?
To restart the electronic controls on your washing machine, turn off the circuit breaker or fuse or unplug the machine for two minutes. If your model has a timer control knob, turn it to any position other than the final spin for the interrupted cycle, then turn the power back on.

Hi, I’m Charlie, and I cover all things laundry here at Appliance Mastery.
I’ve spent over eight years working on washing machines, dryers, and dishwashers. I also have a degree in mechanical engineering, which helps me understand how these appliances really work.
I try to make every guide clear and practical. If you’re stuck with a noisy dryer or a leaking washer, I’ll help you figure out what’s wrong and how to fix it.