
Ever wondered why your clothes take forever to dry? When was the last time you cleaned out your dryer duct? Picture this: a clogged dryer duct not only slows down your laundry routine but also poses a fire hazard. In this article, you’ll discover the simple steps to safely and effectively clean out your dryer duct.
Importance of Cleaning Dryer Ducts
Ensuring clean dryer ducts is crucial for the efficiency and safety of your laundry routine. Here’s why:
- Prevents Fire Hazards: Lint buildup in the duct can lead to overheating and potentially ignite a fire.
- Reduces Drying Time: A clean duct allows for proper airflow, minimizing drying time and saving energy.
- Improves Dryer Lifespan: Removing lint and debris helps your dryer run smoothly, extending its longevity.
Remember, regular maintenance of your dryer ducts is a small effort that goes a long way in keeping your home safe and your laundry routine seamless.
Signs of a Clogged Dryer Duct
When it comes to maintaining your dryer, paying attention to the signs of a clogged dryer duct is crucial. Ignoring these indicators can lead to fire hazards and inefficient drying cycles. Here are some key signs to watch out for:
- Clothes Taking Longer to Dry: If you notice that your laundry is taking longer than usual to dry thoroughly, it could be a sign of a clogged dryer duct.
- Excessive Lint Inside the Dryer: Finding lint build-up inside the dryer or around the lint trap points to a potential clog in the duct.
- Burning Smell: A burning odor while your dryer is running could indicate lint accumulation in the duct, posing a fire risk.
- Hot Dryer or Laundry Room: Touching the top of the dryer and feeling excessive heat or a hot laundry room can signify poor ventilation due to a clogged duct.
To prevent these issues and ensure your safety, it’s essential to regularly inspect and clean your dryer ducts. Paying attention to these warning signs can help you address issues proactively and maintain a safe and efficient laundry routine.
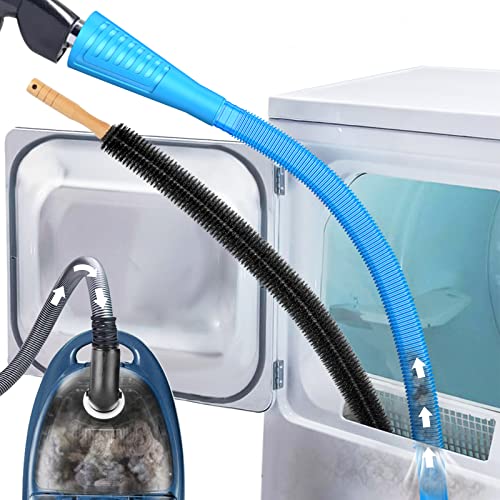
Tools and Equipment Needed
When it comes to cleaning out your dryer duct, having the right tools and equipment can make the task much more manageable and effective. Here are the essentials you’ll need:
- Screwdriver: To help you loosen and remove any fasteners holding the duct in place.
- Vacuum with a Long Attachment: Ideal for sucking up built-up lint and debris within the duct.
- Dryer Vent Brush: Specifically designed to reach and clean deep inside the duct.
- Dust Mask and Gloves: Protect yourself from inhaling dust and coming into direct contact with debris.
- Safety Goggles: Shield your eyes from any particles that may loosen during the cleaning process.
- Duct Tape or Clamp: For securing the duct back in place after cleaning.
Make sure to gather all these items before you start cleaning to ensure a smooth and efficient process.
Recommended Products

Complete Dryer Vent Cleaning Kit – Includes flexible brush, vacuum attachment, and universal connectors for a full dryer duct and vent cleaning.
[REMOVE LINT BUILD-UP] - Sealegend dryer vent cleaner dryer replacement parts removes lint that has accumulated for many years in your dryer vents, making your appliance runs more efficiently and securely.

Home Improvement Hero: Use Sealegend dryer vent cleaner kit to tackle years of built-up lint, boosts your appliance efficiency
How to Clean a Dryer Duct
Cleaning your dryer duct is essential to prevent fire hazards and maintain efficiency. Here’s how you can tackle this task effectively:
- Turn off the dryer: Before starting, make sure your dryer is unplugged to avoid any accidents.
- Remove the dryer duct: Detach the duct from the back of the dryer. Use a screwdriver if needed.
- Inspect for blockages: Check the duct for any lint buildup or obstructions that could be restricting airflow.
- Use a vacuum and brush: Attach a vacuum with a long hose to suck up lint and debris. Follow up with a dryer vent brush to dislodge stubborn buildups.
- Protect yourself: Wear a dust mask, gloves, and safety goggles to shield yourself from dust and debris.
- Reassemble the duct: After cleaning, securely reattach the duct using duct tape or a clamp. Ensure it’s tightly sealed.
- Test your dryer: Plug in the dryer and run it for a few minutes to confirm proper airflow.
- Regular maintenance: Clean your dryer duct at least once a year to prevent hazards and keep your dryer running smoothly.
For a hassle-free laundry routine and peace of mind, regular dryer duct cleaning is key.
Recommended Products

Home Essentials: Fireplace chimney brushes includes two high quality synthetic brush head and flexible rods that extend up to 30 feet

✔✔【HELP PREVENT DRYER VENT FIRES RISK】 The dryer vent cleaning kit removes lint build-up to eliminate a leading cause of dryer vent fires. This is the most valuable tool you can own to ensure the safe operation of your clothes dryer and improve drying machine efficiency. It can also help you save the professional service costs of the dryer vents cleaning.

【Efficient dryer cleaning tool set】-Professional cleaning tool set can help you deep clean buildup lint in the dryer. Including 35feet Dryer Vent Brush × 1, Dryer Lint Vacuum Attachment × 1, Lint Trap Brush × 1, Vacuum Cleaner Adapter x1, Dryer Adapter x1, Drill Bit x 1, Multi-Use Lint Cleaner Brush x1, Anti-SLip Gloves x1, Strong Tape x2, Rods Collection Bag x1, Laundry Bag x1, Lint Collection Bag x25, Lint Grabber x1, Blockage Removal Tool x1, Gap Brush x2
Maintaining a Clean Dryer Duct
To ensure a safe and efficient laundry routine, it’s essential to keep your dryer duct clean and free of debris. Here are some key steps to help you maintain a clean dryer duct:
- Regular Inspection: Check your dryer duct at least once a year for any signs of blockages or buildup that could hinder airflow.
- Cleaning Schedule: Establish a routine to clean your dryer duct at least annually to prevent lint accumulation.
- Using the Right Tools: Invest in a vacuum with a long hose and a dryer vent brush to effectively remove lint and debris.
- Safety First: Wear protective gear such as gloves and a mask to shield yourself from dust and allergens while cleaning the duct.
- Proper Reassembly: Ensure that all components of the duct are securely connected after cleaning to prevent leaks or disconnections.
- Testing the Dryer: Once you’ve cleaned and reassembled the duct, run a test cycle to check for proper airflow and efficient operation of the dryer.
- Professional Inspection: Consider hiring a professional service for a thorough inspection and cleaning if you notice persistent issues with your dryer duct.
| Important Points |
|---|
| Regular Inspection: At least once a year |
| Cleaning Schedule: Annual maintenance |
| Recommended Tools: Vacuum with long hose, dryer vent brush |
| Safety Gear: Gloves and mask |
| Reassembly: Ensure secure connections |
| Testing: Check airflow and dryer operation |
| Professional Help: Consider expert inspection |
Recommended Products

Home Essentials: Holikme dryer vent cleaner kit can easily help you to remove years of built up lint from your dryer vent, making your appliance runs more efficiently and securely; Suitable for most dryer types, please kindly check our product size information for reference in order to better shopping experience

[Stretch Universal Connector] PetOde dryer lint vacuum cleaner attachment is designed with a premium elasticated stretch universal connector that can be connected to most vacuum cleaners! Say goodbye to the worry of purchasing incompatible attachment models

Compatible with More Vacuum Cleaners : The upgraded adapter is designed to fit a wider range of vacuum cleaners. It is easy to assemble—simply follow the instructions and adjust the cable tie according to your vacuum’s diameter
Conclusion
Ensuring your dryer duct is clean is crucial for safety and efficiency. By following the steps outlined in this article, such as regular inspection, using the right tools, and wearing safety gear, you can maintain a well-functioning dryer system. Remember to test for proper airflow and consider professional help if needed. Make it a habit to schedule regular maintenance to prevent future issues. Your diligence in cleaning out your dryer duct will not only prolong the life of your dryer but also keep your home safe.
Frequently Asked Questions
Why is it important to maintain a clean dryer duct?
Regular maintenance of a clean dryer duct prevents fire hazards and improves the efficiency of your dryer, saving energy costs.
How often should I inspect my dryer duct for blockages?
It is recommended to inspect your dryer duct every 6 months for any signs of blockages to ensure optimal airflow.
What tools should I use to clean my dryer duct?
Use a vacuum cleaner with a long hose attachment and a dryer vent brush to effectively clean your dryer duct.
How can I ensure safety while cleaning the dryer duct?
Wear safety gear such as gloves and a mask to protect yourself from dust and debris during the cleaning process.
Do I need to test the dryer for proper airflow after cleaning the duct?
Yes, it is essential to test your dryer for proper airflow after cleaning the duct to ensure it operates efficiently.
When should I consider professional inspection for my dryer duct?
If you encounter persistent issues with your dryer duct or if you are unsure about proper maintenance, consider hiring a professional for inspection.
How often should I schedule maintenance for my dryer duct?
To maintain safety and efficiency, it is recommended to schedule annual maintenance for your dryer duct.

Hi, I’m Charlie, and I cover all things laundry here at Appliance Mastery.
I’ve spent over eight years working on washing machines, dryers, and dishwashers. I also have a degree in mechanical engineering, which helps me understand how these appliances really work.
I try to make every guide clear and practical. If you’re stuck with a noisy dryer or a leaking washer, I’ll help you figure out what’s wrong and how to fix it.