
Struggling with a chilly laundry room and damp clothes that just won’t dry? Ever wondered if you could tackle that dryer issue yourself? Picture this: You load up the dryer, press start, and… nothing. Don’t fret – you’re not alone. But what if I told you that fixing the heating element in your dryer might be easier than you think?
Understanding the Heating Element in Your Dryer
To truly understand how to fix the heating element in your dryer, you need to grasp the basics first. Here’s a breakdown to get you started:
- The heating element is a crucial component responsible for generating the heat needed to dry your clothes effectively.
- It works by converting electricity into heat, which is then circulated throughout the dryer to dry your laundry.
- A malfunctioning heating element can lead to clothes not drying properly, a common issue many face.
Here are a few signs that could indicate a problem with the heating element:
- Clothes are still damp at the end of a drying cycle.
- The dryer is running longer than usual without adequately drying the clothes.
- You notice a lack of heat inside the dryer during operation.
Understanding these indicators can help you troubleshoot effectively and pinpoint if the heating element is indeed the culprit.
Remember, safety first when working on your dryer. Always disconnect the dryer from the power source before attempting any repairs or maintenance.
Common Signs of a Faulty Heating Element
Are you wondering if the heating element in your dryer is causing issues? Here are some telltale signs to look out for:
- Clothes are still damp: Even after a full cycle, your clothes may not be fully dried.
- Lack of heat: If your dryer isn’t generating enough heat, the heating element could be the culprit.
- Extended drying times: Have you noticed that your laundry is taking longer to dry than usual? It could be due to a malfunctioning heating element.
Remember, spotting these signs early can help you address the issue promptly and get your dryer back to optimal performance.
Recommended Products
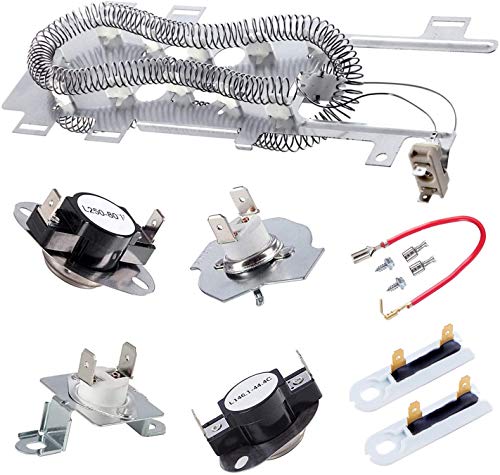
![[UPGRADED] 279838 Dryer Heating Element for Whirlpool Kenmore Maytag Amana Roper, Dryer Heating Element Parts Include Dryer Thermostat Thermal Fuse, Replaces 2406026 3403585 w10724237](https://m.media-amazon.com/images/I/51KK+2MbciL._SL500_.jpg)
Dryer Heating Element Parts Compatible with: kenmore whirlpool roper maytag bravos amana estate cabrio crosley admiral inglis kitchenaid magic chef jenn-air dryers and electric dryers. 279838 dryer heating element replaces part numbers: 3403585 W10724237 3398063 3398064 8565582. Includes: 1 x 279838 dryer heating element,1 x WP3392519 thermal fuse, 1 x 3977393 thermal fuse, 1 x WP3977767 high-limit thermostat,1 x WP3387134 cycling thermostat.

【COMPATIBLE MODELS】: 279838 Dryer Heating Element Parts Compatible with Whirlpool heating element WED4815EW1 WED4800XQ0 WED4800BQ1 WED5300SQ0 MEDX655DW1 MEDC465HW0 ,Maytag heating element NED4655EW1,MEDC465HW0,MED7230HW1,MEDB765FC0,MEDX655DW1,MEDC215EW1, MEDC415EW0, MEDC555DW2, Amana heating element NED4655EW1,NED4655EW0 NED4600YQ1,NED5100TQ1, LER4634EQ0,NED4500VQ0,LER7646JQ0,EED4300SQ0, WED5100VQ1,LER4634JQ1,AED4475TQ1,NED4600YQ1.... compatible with Kenmore 70 80 90 300 400 500 600 series model 110, For more compatible models, please see Figure 6 and Figure 7If you do not confirm, please contact us immediately. We will reply you as soon as possible

【SUPERIOR PERFORMANCE MATERIALS】Our wp3387747 dryer heating element is made with high-quality nickel-chromium (Ni-Cr) content coil and galvanized steel support, ensuring quick and even heating, high anti-corrosion, and durability. With a spiral tight design that is 30% longer than other dryer coils, it increases resistance by more than 70%, providing high performance with low power consumption.(5400Watt 240 Volt)⚠️Be sure to disconnect the power supply before installation
Tools and Materials Needed for the Fix
When tackling the task of fixing the heating element in your dryer, having the right tools and materials at hand is crucial for a smooth repair process. Here are the essentials you’ll need:
- Multimeter
- Screwdriver
- Replacement heating element
- Gloves and safety goggles
- Duct tape
- Putty knife
Gathering these tools and materials before you begin the repair ensures you have everything you need to effectively address the issue with your dryer’s heating element.
Step-by-Step Guide to Replacing the Heating Element
When tackling the replacement of your dryer’s heating element, it’s essential to proceed methodically. Here is a step-by-step guide to help you navigate through the process smoothly and efficiently:
Prepare Your Workspace
- Unplug the dryer and move it to an open, well-lit area.
- Gather all the necessary tools and materials you’ll need for the task.
Access the Heating Element
- Refer to your dryer’s manual to locate the heating element.
- Use the appropriate tools to open the dryer and access the faulty heating element.
Remove the Faulty Heating Element
- Carefully detach any connections or wires attached to the old heating element.
- Remove the screws or fastenings holding the element in place and take out the defective part.
Install the New Heating Element
- Position the replacement heating element securely in the designated spot.
- Reattach any wires or connections, ensuring they are correctly fitted.
Reassemble and Test
- Put back the dryer panels and secure them in place.
- Plug in the dryer, set it to a test cycle, and confirm that the new heating element is functioning properly.
Final Checks
- Test the dryer with a regular load to ensure consistent heat distribution.
- Monitor the dryer during operation to verify that the issue has been resolved.
- Throughout the process, remember to prioritize safety by wearing protective gear and following all manufacturer guidelines and precautions.
Remember, taking your time and following these steps diligently will help you successfully replace the heating element in your dryer.
Recommended Products
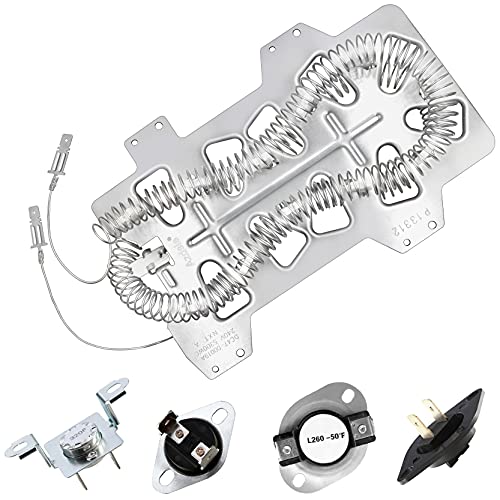
Wp8544771 Package Includes: 2 x 3392519 dryer thermal fuse, 1 x wp8544771 dryer heating element and 1 x 279973 thermal fuse, 1 x 279816 thermostat;

✅[QUALITY GROWTH] Excellent heat-proof and abrasion-proof. 2026 UPGRADE 279838 dryer heating element NICKEL-CHROMIUM content reaches 95% and the length of the heating wire is 25% longer than other common dryer replacement parts. So it will last longer than other brand and OEM parts.
Azdele Heating element for samsung dryer: dc47-00019a samsung heating element wire is 25% longer than other dryer wires, increasing the resistance by 65% and producing stable heating.
Testing the Dryer After the Repair
After installing the new heating element, it’s crucial to test your dryer to ensure proper functionality. Here are the steps to follow:
- Plug in the dryer and set it to a heat cycle.
- Wait for several minutes to see if the dryer produces heat.
- Ensure that the air blowing out is warm.
- Check if your clothes are drying properly.
If you notice any issues, such as lack of heat or poor drying performance, recheck the installation of the heating element and make sure all connections are secure.
Remember to refer to your dryer’s manual for specific instructions on testing and troubleshooting after replacing the heating element.
Conclusion
You now have the knowledge and skills to successfully replace the heating element in your dryer. Remember to follow the steps carefully, ensuring proper installation and testing for functionality. By testing the dryer after the replacement, you can confirm that it is working efficiently and effectively. If any issues arise, double-check the installation and connections, and refer to the dryer’s manual for troubleshooting guidance. With these steps, you can keep your dryer running smoothly and your clothes drying perfectly. Happy fixing!
Frequently Asked Questions
How important is workspace preparation before replacing a heating element in a dryer?
Workspace preparation is crucial to ensure safety and efficiency. Clear the area around the dryer, unplug it, and turn off the gas supply if applicable. It’s also recommended to wear safety gear like gloves and goggles.
How do I access the heating element in a dryer?
Access depends on the dryer model, but it usually involves opening the dryer cabinet or removing the back panel. Locate the heating element which is typically near the drum, and disconnect any wires or components attached to it.
What precautions should I take when removing and installing a new heating element?
Handle the heating element carefully to avoid damage. Note the position of wires before disconnecting them and follow the manufacturer’s instructions for installation. Make sure all connections are secure to prevent potential hazards.
How do I test the dryer after replacing the heating element?
After installing the new heating element, plug in the dryer, set it to a heat cycle, and check for heat production. Ensure warm air is blowing out, and test if clothes dry properly. If any issues arise, review the installation steps and connections. Remember to consult the dryer’s manual for specific testing guidelines.

Hi, I’m Charlie, and I cover all things laundry here at Appliance Mastery.
I’ve spent over eight years working on washing machines, dryers, and dishwashers. I also have a degree in mechanical engineering, which helps me understand how these appliances really work.
I try to make every guide clear and practical. If you’re stuck with a noisy dryer or a leaking washer, I’ll help you figure out what’s wrong and how to fix it.