
Ever found yourself staring at your Whirlpool dryer, wondering why it’s suddenly decided to take a vacation from drying your clothes? Well, it might just be a case of a worn-out dryer belt. But worry not, because you’re about to learn how to tackle this common issue like a pro.
Picture this: You’ve got a pile of laundry waiting to be dried, and your faithful dryer is out of commission. Fret not, as we’re here to guide you through the simple yet crucial process of replacing the dryer belt on your Whirlpool dryer.
Gather the Necessary Tools
To replace the dryer belt in your Whirlpool dryer, you’ll need a few tools. Here’s what you’ll require:
- Replacement dryer belt specific to your Whirlpool model
- Screwdriver (typically a Phillips or a flat-head)
- Putty knife or a similar tool
- Work gloves to protect your hands
- Safety goggles for eye protection
- Optional: Vacuum cleaner to clean out any dust or debris while you have the dryer open
Having these tools handy will make the dryer belt replacement process much smoother.
Recommended Products
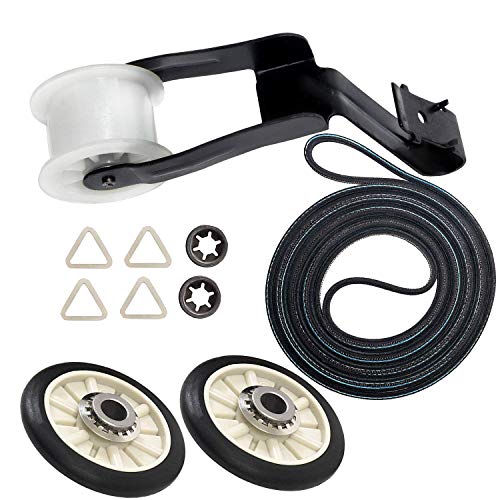
COMPLETE REPAIR KIT: Includes x2 349241T Dryer Rear Drum Support Rollers, x1 691366 Dryer Idler Pulley Assembly, x1 341241 Dryer Drum Belt (1/4" wide, 92 1/4" long, 4 ribs, 3 grooves), x4 Tri-rings, and x2 Clips. The 4392065 Dryer Repair Kit is a direct replacement for part numbers AP3131942, 587636, 4392065, 2014, 26000279435, 26000279436, 279435, 279436, 279708, 279708MS, 279709, 279709MS, 279860, 279948, 4392065VP, 80046, 8106, 8237, 8238, PS373087.

COMPLETE DRYER REPAIR KIT: Includes 1 x 8066184 Dryer Motor Pulley and 1 x 341241 Dryer Drum Belt—everything you need for a smooth and efficient dryer repair. Before ordering, please double-check your model number for compatibility. Not sure if it fits? Simply send us your dryer model number, and we’ll be happy to assist you!

100% LIFETIME PROTECTION: Enjoy reliable performance with our lifetime protection, ensuring that your product will always be covered for any defects or issues that may arise.
Unplug the Dryer
Before starting the replacement process, Unplug the Dryer from the power outlet to ensure your safety. It’s essential to prevent any electrical mishaps while working on your Whirlpool dryer.
Remember, safety always comes first when dealing with any appliance repair.
Access the Dryer Belt
To access the dryer belt in your Whirlpool dryer, you’ll need to follow these steps:
- Unplug the dryer from the power outlet to ensure safety.
- Locate and remove the screws from the back panel of the dryer.
- Use a putty knife to release the front panel clips and remove the front panel.
- Set the front panel aside carefully to access the drum and belt.
- Take note of how the current dryer belt is positioned before proceeding with the replacement.
Remember to handle all parts with care to avoid any damage during the process.
Recommended Products

High-Performance-- Crafted from high-quality sturdy rubber, the 341241 dryer drum drive belt offers exceptional flexibility, strength, and wear resistance for reliable and long-lasting performance

MODEL NUMBER: 341241 Dryer Drum Belt is approximately 1/4" wide x 92-1/4" long. This drum belt is flat and has 4 ribs and 3 grooves.

100% LIFETIME PROTECTION: Enjoy reliable performance with our lifetime protection, ensuring that your product will always be covered for any defects or issues that may arise.
Remove the Old Dryer Belt
To remove the old dryer belt in your Whirlpool dryer, follow these simple steps:
- Disconnect the Power: Ensure the dryer is unplugged before starting any work.
- Access the Drum: Open the dryer door and locate the screws at the top of the opening holding the top panel in place.
- Remove the Top Panel: Use a screwdriver to remove the screws and lift the top panel to access the drum.
- Release the Belt: Reach underneath the drum to release the old belt. You may need to push the idler pulley to relieve tension.
- Detach the Belt: Carefully slip the old belt off the motor and idler pulley.
- Remove the Drum: With the belt off, lift the drum out of the dryer to fully remove the old belt.
By following these steps, you can effectively remove the old dryer belt from your Whirlpool dryer.
Install the New Dryer Belt
Now that you’ve successfully removed the old dryer belt, it’s time to install the new one. Follow these steps to complete the process smoothly:
- Place the Belt: Position the new dryer belt around the drum where the old belt was previously located.
- Align Properly: Make sure the belt is aligned correctly on the drum, ensuring it won’t slip off during operation.
- Thread Through Pulley: As you position the drum back into the dryer unit, thread the belt through the idler pulley.
- Apply Tension: Gently pull the idler pulley to apply tension to the belt – this ensures it remains taut during use.
- Rotate the Drum: Rotate the drum a few times by hand to confirm the belt is properly secured and won’t come loose.
- Reassemble: Put the dryer’s front panel back, secure any screws or clips, and return the top panel to its original position.
- Test Run: Plug the dryer back in, run a test cycle to ensure everything is working correctly with the new dryer belt.
Reassemble the Dryer
Now that you’ve successfully installed the new dryer belt, reassembly is the final step in getting your Whirlpool dryer back up and running smoothly. Here’s what you need to do next:
- Position the Front Panel: Align the front panel and secure it back in place by screwing it in.
- Reconnect the Wires: Make sure to reconnect any wires or cables you detached earlier in the process.
- Replace the Dryer Door: Attach the dryer door securely to the front panel.
- Screw in the Top Panel: Once the front panel is in place, secure the top panel back by screwing it in.
By following these steps, you’ll have your Whirlpool dryer fully reassembled and ready to use.
Test the Dryer
- Plug-In and Power On: Begin by plugging in the dryer and turning on the power.
- Select a Cycle: Choose a cycle and let the dryer run for a few minutes to see if the drum is spinning smoothly.
- Check for Squeaking or Odd Noises: Listen carefully for any unusual sounds that could indicate an issue with the belt installation.
- Monitor Temperature: Feel the air temperature inside the dryer to confirm it’s heating properly.
- Inspect the Belt: Watch the belt in action to ensure it’s moving freely without slipping or coming off track.
| Key Points |
|---|
| Plug in and turn on the dryer. |
| Run a cycle to check the drum’s motion. |
| Listen for any unusual sounds. |
| Verify proper heating. |
| Monitor the belt’s movement. |
Conclusion
You now have all the necessary steps to successfully replace the dryer belt in your Whirlpool dryer. By following the guide provided, you can ensure that your dryer is operating smoothly and efficiently. Remember to test the dryer after reassembly to confirm that everything is in working order. With these instructions, you can confidently maintain your Whirlpool dryer and keep it running at its best. Happy drying!
Frequently Asked Questions
How do I remove the old dryer belt from my Whirlpool dryer?
To remove the old dryer belt, first unplug the dryer. Remove the lint screen and unscrew the lint screen housing. Release the console’s clips and lift the console. Disconnect the wire harness and screws to remove the top panel. Take out the front panel screws and disconnect the door switch wires. Slide the front panel off and remove the old belt.
How do I install a new dryer belt in my Whirlpool dryer?
To install a new dryer belt, place it around the drum where the old belt was positioned. Loop the belt around the motor and idler pulley. Reassemble the front panel, aligning the drum bearings. Reconnect the wires and secure the front panel. Reattach the top panel, lint screen housing, and console. Plug in the dryer and test it to ensure smooth operation.
What are the steps to reassemble the Whirlpool dryer after installing a new belt?
To reassemble the Whirlpool dryer, align and secure the front panel with the drum bearings. Reconnect any detached wires or cables, ensuring proper connections. Attach the dryer door securely, making sure it closes properly. Screw in the top panel, securing it in place. Plug in the dryer and select a cycle to test the drum’s motion, heating, and belt movement for smooth operation.
How can I ensure my Whirlpool dryer is fully reassembled and ready for use?
To ensure that your Whirlpool dryer is fully reassembled and ready for use, carefully follow all steps in the installation process. Test the dryer by plugging it in, selecting a cycle, and observing the drum’s motion and any unusual sounds. Verify that the dryer is heating properly and monitor the new belt’s movement to ensure it operates smoothly. This thorough testing will confirm that your Whirlpool dryer is fully reassembled and in good working condition.

Hi, I’m Charlie, and I cover all things laundry here at Appliance Mastery.
I’ve spent over eight years working on washing machines, dryers, and dishwashers. I also have a degree in mechanical engineering, which helps me understand how these appliances really work.
I try to make every guide clear and practical. If you’re stuck with a noisy dryer or a leaking washer, I’ll help you figure out what’s wrong and how to fix it.