
Ever wondered why your clothes take forever to dry? Picture this: you’re constantly running the dryer, but it seems like your laundry is stuck in a never-ending cycle. What if we told you there’s a simple solution that could save you time and money? In this article, we’ll show you how to vacuum out your dryer vent effortlessly. Say goodbye to damp clothes and hello to quicker drying times!
When was the last time you cleaned out your dryer vent? If you can’t remember, it might be time for some maintenance. By learning how to vacuum out your dryer vent properly, you’ll not only improve the efficiency of your dryer but also reduce the risk of potential fire hazards. Stick around to discover the easy steps to keep your dryer running smoothly and your clothes drying faster.
Importance of Cleaning Dryer Vents
When it comes to drying your clothes efficiently, cleaning your dryer vents plays a crucial role. Here’s why it’s so important:
- Prevention of Fire Hazards: A clogged dryer vent can lead to lint build-up, creating a fire hazard in your home. By regularly cleaning your dryer vents, you reduce this risk significantly.
- Enhanced Efficiency: A clean dryer vent allows for proper airflow, improving the drying efficiency of your machine. This means less time spent drying your clothes and lower energy bills.
- Avoid Costly Repairs: Neglecting dryer vent cleaning can cause your dryer to overheat, leading to mechanical issues that may require expensive repairs. Regular maintenance can help you avoid these costs.
- Prolonged Dryer Lifespan: By keeping your dryer vents clear of debris, you help extend the lifespan of your appliance. This simple task can save you money in the long run.
- Improved Air Quality: A clean dryer vent promotes better indoor air quality by preventing mold growth and dust accumulation.
Ensuring your dryer vents are clean is a small task that can have significant benefits for your home and wallet. Make it a regular part of your maintenance routine to enjoy faster drying times, lower risks, and a more efficient appliance.
Signs Your Dryer Vent Needs Cleaning
If it’s been a while since you last cleaned your dryer vent, it’s important to keep an eye out for these signs that indicate it may be time for a cleaning:
- Clothes Taking Longer to Dry: Are your clothes consistently damp at the end of a drying cycle? This could be a sign of a clogged vent.
- Musty Smell: Have you noticed a musty odor coming from your dryer or the laundry room? This unpleasant smell may be a result of lint buildup in the vent.
- Excessive Lint: Check the lint trap after each load. If you notice an excess amount of lint, it could be an early warning sign that your vent needs attention.
- Hot Dryer or Laundry Room: Is your dryer hot to the touch or is the laundry room unusually warm during operation? This could indicate poor ventilation due to a clogged vent.
- Visible Debris: Take a look behind your dryer. If you see visible lint or debris around the vent opening, it’s a clear sign that cleaning is necessary.
- Increased Energy Bills: Have you noticed a spike in your energy bills without a corresponding increase in usage? A clogged dryer vent can force your appliance to work harder, leading to higher energy consumption.
Regular maintenance can prevent these issues and keep your dryer running efficiently.
Tools Required for Vacuuming Dryer Vent
When vacuuming out your dryer vent, having the right tools is essential for a successful and efficient cleaning process. Here are the tools you’ll need to get the job done effectively:
- Vacuum cleaner with a long hose attachment: This will allow you to reach deep into the dryer vent to remove built-up lint and debris.
- Dryer vent cleaning kit: This kit typically includes a brush and flexible rods to help dislodge and remove lint from the vent walls.
- Screwdriver: You may need this tool to loosen any clamps or screws holding the vent in place for thorough cleaning.
- Microfiber cloth: Use this cloth to wipe down the exterior of the vent and surrounding area after cleaning.
- Safety gear: It’s important to prioritize safety, so don’t forget to wear gloves and a mask to protect yourself from dust and debris.
Before starting, ensure you have all these tools ready to make your dryer vent cleaning process smooth and effective.
Recommended Products

[Stretch Universal Connector] PetOde dryer lint vacuum cleaner attachment is designed with a premium elasticated stretch universal connector that can be connected to most vacuum cleaners! Say goodbye to the worry of purchasing incompatible attachment models
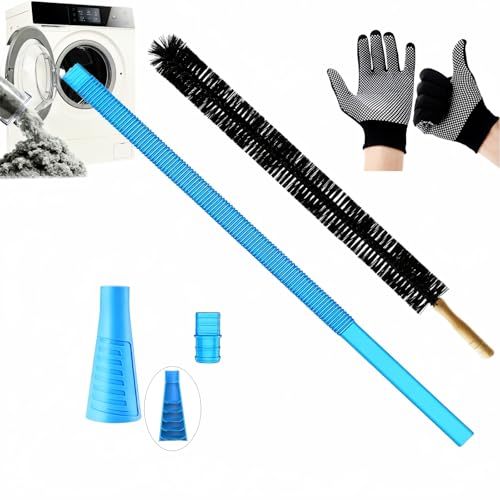
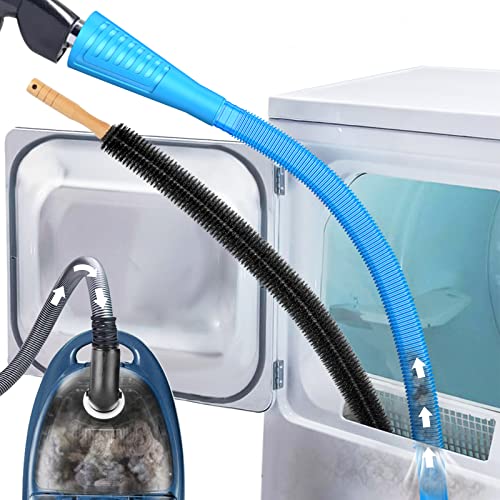
Cleaning the Hard-to-reach Lint Act:The long-reaching brush and hose combination allows you to thoroughly clean deep into your dryer vent system, removing built-up lint and debris that can affect your dryer's performance.
[REMOVE LINT BUILD-UP] - Sealegend dryer vent cleaner dryer replacement parts removes lint that has accumulated for many years in your dryer vents, making your appliance runs more efficiently and securely.
Step-by-Step Guide to Vacuuming Out Dryer Vent
To effectively vacuum out your dryer vent, follow these simple steps:
- Turn off the dryer: Before starting, make sure your dryer is turned off and unplugged to ensure safety while cleaning.
- Disconnect the dryer: Pull your dryer away from the wall to access the vent more easily.
- Detach the vent: Unscrew the clamp and detach the vent from the dryer to access the interior of the vent.
- Prepare your vacuum: Attach a long hose extension to your vacuum cleaner to reach deep into the vent.
- Clean the vent: Use the vacuum attachment to remove lint, debris, and any blockages from the vent thoroughly.
- Check for blockages: Ensure there are no remaining blockages in the vent that could hinder airflow and increase the risk of fires.
- Reattach the vent: Once cleaned, reattach the vent, secure it with the clamp, and push the dryer back into place.
Regularly cleaning your dryer vent helps prevent fires, improves efficiency, and extends the lifespan of your dryer. Vacuuming out the vent is a simple yet essential maintenance task that should be done at least once a year.
Recommended Products

Home Essentials: Holikme dryer vent cleaner kit can easily help you to remove years of built up lint from your dryer vent, making your appliance runs more efficiently and securely; Suitable for most dryer types, please kindly check our product size information for reference in order to better shopping experience

Compatible with More Vacuum Cleaners : The upgraded adapter is designed to fit a wider range of vacuum cleaners. It is easy to assemble—simply follow the instructions and adjust the cable tie according to your vacuum’s diameter

[FITS MOST VACUUM CLEANERS ] Sealegend dryer vent vacuum attachment features a premium universal connector design, compatible with most vacuum cleaners, solving compatibility issues!
Tips for Maintaining a Clean Dryer Vent
- Regular Cleaning: You should clean your dryer vent at least once a year to prevent fire hazards and improve efficiency.
- Observe Warning Signs: Be alert to any warning signs like longer drying times or a burning smell coming from the dryer.
- Use the Right Tools: Invest in a vent cleaning kit or hire a professional service for a thorough cleaning.
- Remove Debris: Make sure to remove any lint or debris from the vent and the area around your dryer.
- Check the Outside Vent: Regularly inspect the exterior vent to ensure it’s clear of any obstructions.
- Avoid Overloading: Don’t overload your dryer as it can lead to an increase in lint production.
| Important Facts |
|---|
| You should clean your dryer vent at least once a year |
| Be alert to warning signs such as longer drying times |
| Avoid overloading your dryer to reduce lint buildup |
Conclusion
Regularly cleaning your dryer vent is crucial for preventing fire hazards and maximizing efficiency. Keep an eye out for signs like longer drying times or strange odors. Using the right tools, such as a vent cleaning kit or professional service, ensures a thorough clean. Remember to clear out lint, inspect the exterior vent, and avoid overloading your dryer to reduce lint buildup. By following these maintenance tips, you’ll not only enhance your dryer’s performance but also create a safer environment in your home. Stay proactive in caring for your dryer vent to enjoy its benefits for years to come.
Frequently Asked Questions
How often should I clean my dryer vents?
It is recommended to clean your dryer vents at least once a year to prevent fire hazards and ensure optimal efficiency.
What are some warning signs that my dryer vents need cleaning?
Watch out for warning signs like extended drying times, unusual smells, or hot dryer surfaces, as these indicate a need for vent cleaning.
What tools should I use for cleaning dryer vents?
Consider using a vent cleaning kit or hiring a professional service for a thorough cleaning of your dryer vents.
What maintenance practices can help improve dryer performance and safety?
Regularly remove lint and debris, check the exterior vent for obstructions, and avoid overloading the dryer to reduce lint buildup and enhance safety and performance.

Hi, I’m Charlie, and I cover all things laundry here at Appliance Mastery.
I’ve spent over eight years working on washing machines, dryers, and dishwashers. I also have a degree in mechanical engineering, which helps me understand how these appliances really work.
I try to make every guide clear and practical. If you’re stuck with a noisy dryer or a leaking washer, I’ll help you figure out what’s wrong and how to fix it.