
An old Whirlpool dishwasher not draining often indicates a clogged drain or malfunctioning components. Homeowners can resolve this issue by checking the drain hose, cleaning the filter, and inspecting the pump for blockages.
Whirlpool Dishwasher Drainage Symptoms Explained
Understanding the symptoms of a dishwasher that won’t drain is essential. Common indicators include water pooling at the bottom of the tub, slow draining, or unusual noises during the cycle. Identifying these symptoms can help narrow down potential causes and solutions.
| Symptom | Primary Suspect | Difficulty (1-5) |
|---|---|---|
| Water pooling in the bottom | Clogged drain hose | 2 |
| Slow draining | Dirty filter | 1 |
| Unusual noises | Faulty pump | 3 |
| Error codes | Electrical issue | 4 |
Whirlpool Dishwasher Drain Hose Inspection
When your old Whirlpool dishwasher isn’t draining properly, one of the first areas to check is the drain hose. A clogged or kinked hose can prevent water from flowing out, leading to standing water in the bottom of the appliance. This section will guide you through the inspection process to ensure your dishwasher operates efficiently.
Inspecting the drain hose is a crucial first step. A kinked or clogged hose can prevent water from exiting the dishwasher. Ensure the hose is not pinched and is properly connected to the sink drain or garbage disposal.
Turn off the power at the circuit breaker.
Locate the drain hose at the back of the dishwasher.
Remove the drain hose from the connection point.
Inspect for clogs by running water through it.
Clear any blockages using a flexible brush or a straightened coat hanger.
Whirlpool Dishwasher Filter Cleaning Steps
A clogged filter can often be the culprit behind a Whirlpool dishwasher that isn’t draining properly. By following these straightforward cleaning steps, you can ensure your dishwasher operates efficiently and effectively. This guide will walk you through the process of maintaining your filter for optimal performance.
A dirty filter can significantly hinder drainage. Regular cleaning of the filter is essential for optimal performance. The filter is typically located at the bottom of the dishwasher.
Remove the bottom rack to access the filter.
Twist and lift the filter out of its compartment.
Rinse under warm water to remove debris.
Use a soft brush to scrub away stubborn residues.
Reinsert the filter securely back into place.
Whirlpool Dishwasher Drain Pump Inspection Steps
If your old Whirlpool dishwasher isn’t draining properly, inspecting the drain pump is a crucial step in troubleshooting the issue. This guide will walk you through the necessary steps to examine the drain pump, ensuring you can identify any blockages or malfunctions that might be preventing your dishwasher from functioning effectively.
The drain pump is responsible for expelling water from the dishwasher. If the pump is faulty, it may need to be replaced. Checking the pump involves a few steps.
Disconnect power to the dishwasher.
Remove the lower spray arm and cover to access the pump.
Check for blockages in the pump impeller.
Test the pump with a multimeter for electrical continuity.
Replace the pump if it shows signs of failure.
Recommended Products
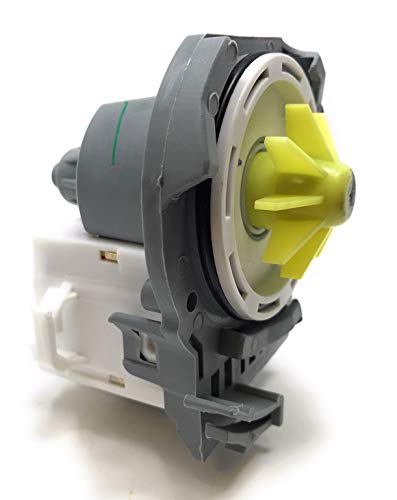
Dishwasher Drain Pump W10876537, W10348269, also replace W10724439.

WHIRL-POOL DISHWASHER DRAIN PUMP --- Dishwasher drain pump W10724439 specifications 120VAC, 60Hz, made of high-strength and durable materials, strong and stable for long term effectiveness. During the drain phase of the dishwashing cycle, the drain pump removes water from the dishwasher basin

【Directly Replaces】 W10348269 drain pump assembly (120VAC, 60Hz, 50W, 0.7A) is housed on the inside of the appliance. Directly replaces 8558995, 661662, 8565839, W10158351, W10084573, W10348269, AP5691922, AP6020066, PS8688439 and PS11753379
Whirlpool Dishwasher Electrical Component Check
When troubleshooting a Whirlpool dishwasher that isn’t draining, it’s essential to examine the electrical components. This section will guide you through identifying potential issues with the wiring, switches, and other electrical parts that could be affecting the drain function. A thorough check can help pinpoint the problem and lead to a straightforward DIY fix.
Electrical issues can also prevent proper draining. Faulty wiring or malfunctioning switches may disrupt the operation of the drain pump. Testing these components requires some technical knowledge.
Access the control panel by removing screws.
Inspect wiring connections for signs of wear or corrosion.
Test the door latch switch for proper operation.
Check the timer or control board for functionality.
Replace any damaged components as needed.
Whirlpool Dishwasher Maintenance for Efficient Draining
Proper maintenance of your Whirlpool dishwasher is essential for ensuring efficient draining and optimal performance. Regular checks and simple upkeep can prevent common issues that lead to drainage problems. This section outlines practical steps to maintain your appliance, helping you avoid costly repairs and keep your kitchen running smoothly.
Regular maintenance can prevent drainage issues from arising. Implement these practices to ensure your dishwasher operates efficiently.
Run hot water in the sink before starting the dishwasher to improve drainage.
Use dishwasher cleaner monthly to prevent buildup.
Check the garbage disposal for clogs if connected to the dishwasher.
Inspect the air gap if one is installed for blockages.
Whirlpool Dishwasher Safety Precautions
Before tackling any issues with your old Whirlpool dishwasher, it’s essential to prioritize safety. Understanding the necessary precautions can help prevent accidents and ensure a smooth repair process. This section outlines critical safety measures to follow while diagnosing and fixing drainage problems.
Always disconnect power before performing any maintenance on your dishwasher. This ensures safety and prevents electrical hazards during repairs.

Hey, I’m Jake. I focus on cooling systems at Appliance Mastery, like fridges, freezers, and air conditioners.
I’ve worked in appliance repair for more than ten years and I’m certified through NASTeC. I’ve seen just about every fridge issue you can imagine.
My goal is to help you fix problems without stress. Whether it’s a freezer that won’t cool or an AC that keeps beeping, I’m here to walk you through it.