
Ever had that sinking feeling when you realize your dryer has called it quits? Picture this: a mountain of laundry waiting to be dried, and your trusty appliance decides to take a break. What now? Don’t fret, you’re not alone in this laundry saga.
When your dryer decides to be a party pooper, it can throw your whole routine off track. But fear not, we’ve got your back! In this article, we’ll walk you through simple steps to troubleshoot and fix your dryer like a pro.
Say goodbye to damp clothes and hello to stress-free laundry days! By the end of this read, you’ll be equipped with the knowledge and confidence to tackle any dryer dilemma that comes your way. Let’s get that dryer back in action, shall we?
Check the Power Source
When your dryer stops working, the first step is to ensure it’s properly connected to the power source:
- Verify that the dryer is plugged in. Sometimes, the plug can get dislodged unintentionally.
- Check the circuit breaker to see if it’s tripped. Reset it if necessary.
- Inspect the power cord for any damage. A frayed cord can prevent proper electrical connection.
- Test the outlet with another device to confirm it’s supplying power.
If none of these steps resolve the issue, it might be time to delve into other potential causes.
Inspect the Dryer Vent
When your dryer stops working, it’s essential to Inspect the Dryer Vent to ensure proper airflow. Over time, lint and debris can accumulate in the vent, causing blockages that hinder the dryer’s performance. Here’s what you should do:
- Start by disconnecting the dryer from the power source.
- Locate the dryer vent on the back of the appliance.
- Remove the vent cover and check for any obstructions.
- Use a vacuum or a vent cleaning brush to clear out any debris.
- Ensure that the vent hose is not kinked or damaged.
Neglecting the dryer vent can not only lead to inefficient drying but also pose a fire hazard. By regularly inspecting and cleaning the vent, you can maintain your dryer’s efficiency and extend its lifespan.
Recommended Products

[Stretch Universal Connector] PetOde dryer lint vacuum cleaner attachment is designed with a premium elasticated stretch universal connector that can be connected to most vacuum cleaners! Say goodbye to the worry of purchasing incompatible attachment models

Extended cleaning hose reaches deep inside ductwork, paired with vent-specific fittings to reach lint buildup spots. It quickly clears trapped debris to boost airflow and shorten drying cycles

[Universal Connector] PetOde dryer lint vacuum cleaner attachment is designed with a premium universal connector that can be connected to most vacuum cleaners! Say goodbye to the worry of purchasing incompatible attachment models
Clean the Lint Screen and Lint Trap
When your dryer stops working, one of the first things to check is the lint screen and lint trap. These components play a crucial role in maintaining your dryer’s efficiency and safety by capturing lint and debris. Here are some steps to help you with this task:
- Start by locating the lint screen, usually found on the top of the dryer or inside the door rim. Remove any visible lint by hand to prevent buildup.
- Next, clean the lint trap by pulling it out (usually located inside the dryer door or at the front of the machine), removing the lint, and giving it a good rinse to clear any stubborn residue.
- Inspect the lint screen and trap for any damage, such as holes or tears, that may affect their functionality. If damaged, consider replacing them to ensure optimal performance.
- Remember to clean these components regularly. A clogged lint screen or trap can lead to poor airflow, longer drying times, and even pose a fire hazard.
- Tip: To enhance airflow and prevent lint buildup, consider washing the lint screen periodically with mild soap and water to remove residues left by fabric softeners or dryer sheets.
Take care of your lint screen and lint trap to keep your dryer running smoothly and efficiently.
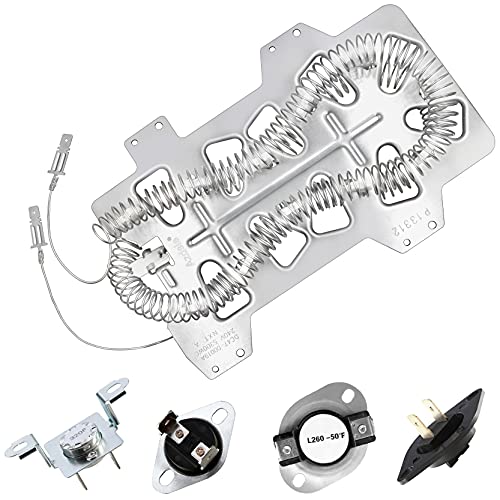
Examine the Heating Element
When your dryer stops working, a common culprit could be the heating element. This essential component is responsible for generating the heat needed to dry your clothes effectively. Here’s what you can do to examine the heating element:
- Locate the heating element: Depending on your dryer model, the heating element is typically found behind the dryer drum or on the bottom of the unit.
- Visually inspect for damage: Look for any visible signs of damage such as burns, breaks, or discoloration on the heating element coils.
- Check for continuity: Using a multimeter, test the heating element for continuity to determine if it is functioning properly.
- Consult the user manual: If you’re unsure how to access or test the heating element, refer to your dryer’s user manual for guidance.
Addressing these points can help you assess the condition of the heating element and determine if it is the reason your dryer has stopped working efficiently.
Recommended Products

【COMPATIBLE MODELS】: 279838 Dryer Heating Element Parts Compatible with Whirlpool heating element WED4815EW1 WED4800XQ0 WED4800BQ1 WED5300SQ0 MEDX655DW1 MEDC465HW0 ,Maytag heating element NED4655EW1,MEDC465HW0,MED7230HW1,MEDB765FC0,MEDX655DW1,MEDC215EW1, MEDC415EW0, MEDC555DW2, Amana heating element NED4655EW1,NED4655EW0 NED4600YQ1,NED5100TQ1, LER4634EQ0,NED4500VQ0,LER7646JQ0,EED4300SQ0, WED5100VQ1,LER4634JQ1,AED4475TQ1,NED4600YQ1.... compatible with Kenmore 70 80 90 300 400 500 600 series model 110, For more compatible models, please see Figure 6 and Figure 7If you do not confirm, please contact us immediately. We will reply you as soon as possible
![[UPGRADED] 279838 Dryer Heating Element for Whirlpool Kenmore Maytag Amana Roper, Dryer Heating Element Parts Include Dryer Thermostat Thermal Fuse, Replaces 2406026 3403585 w10724237](https://m.media-amazon.com/images/I/51KK+2MbciL._SL500_.jpg)
Dryer Heating Element Parts Compatible with: kenmore whirlpool roper maytag bravos amana estate cabrio crosley admiral inglis kitchenaid magic chef jenn-air dryers and electric dryers. 279838 dryer heating element replaces part numbers: 3403585 W10724237 3398063 3398064 8565582. Includes: 1 x 279838 dryer heating element,1 x WP3392519 thermal fuse, 1 x 3977393 thermal fuse, 1 x WP3977767 high-limit thermostat,1 x WP3387134 cycling thermostat.
Azdele Heating element for samsung dryer: dc47-00019a samsung heating element wire is 25% longer than other dryer wires, increasing the resistance by 65% and producing stable heating.
Test the Thermostat and Thermal Fuse
When your dryer stops working, it could be due to issues with the thermostat or thermal fuse. These components are crucial for regulating the dryer’s temperature and preventing overheating. Here’s what you can do to test them:
- Locate the Thermostat and Thermal Fuse: They are typically found near the heating element or blower housing. Refer to your dryer’s manual for specific instructions on their exact location.
- Check for Continuity: Using a multimeter, set it to the lowest ohms of resistance and test the thermostat and thermal fuse for continuity. If there is no continuity, it indicates a faulty component that needs replacement.
- Inspect for Physical Damage: Look for any signs of corrosion, burning, or other visible damage on the thermostat and thermal fuse. Damaged components should be replaced to ensure proper functioning of the dryer.
- Reset the Thermal Fuse: Some dryers have a thermal fuse that can be reset if tripped. Follow the instructions in your manual to locate and reset the thermal fuse if necessary.
- Consult a Professional: If you are unsure about testing the thermostat and thermal fuse on your own, it’s best to consult a professional or a technician for assistance. They can accurately diagnose the issue and recommend the appropriate course of action.
By checking and testing the thermostat and thermal fuse, you can troubleshoot potential causes of your dryer malfunction and take the necessary steps to get it up and running smoothly again.
Conclusion
Now that you’ve learned about maintaining your dryer’s efficiency and safety, you’re equipped to tackle common issues that may arise. By regularly cleaning the lint screen and trap, you can prevent airflow problems and reduce the risk of fire hazards. Remember to wash the lint screen with mild soap and water to keep it in top condition. If your dryer stops working, don’t panic. Check the heating element, thermostat, and thermal fuse using the simple steps outlined in this article. By testing these components, you can troubleshoot malfunctions and ensure your dryer operates smoothly. If you encounter any difficulties, don’t hesitate to seek help from a professional to get your dryer back up and running efficiently.
Frequently Asked Questions
Why is it important to clean the dryer lint screen regularly?
Cleaning the lint screen regularly is crucial for maintaining dryer efficiency, preventing airflow issues, and reducing fire hazards.
How should I clean the lint screen?
Wash the lint screen with mild soap and water periodically to remove built-up residue and improve ventilation.
What could cause dryer malfunctions?
An examined heating element is a common cause. It’s essential to test the thermostat and thermal fuse for proper temperature regulation and overheating prevention.
How can I test the thermostat and thermal fuse?
Test continuity with a multimeter, inspect for physical damage, and reset the thermal fuse if necessary to troubleshoot dryer malfunctions effectively.

Hi, I’m Charlie, and I cover all things laundry here at Appliance Mastery.
I’ve spent over eight years working on washing machines, dryers, and dishwashers. I also have a degree in mechanical engineering, which helps me understand how these appliances really work.
I try to make every guide clear and practical. If you’re stuck with a noisy dryer or a leaking washer, I’ll help you figure out what’s wrong and how to fix it.