
Replacing the heating element in a Whirlpool dryer is a straightforward DIY task that can restore its drying efficiency. This guide provides step-by-step instructions to help you complete the replacement safely and effectively.
Essential Tools for Whirlpool Dryer Repair
Before diving into the process of replacing the heating element in your Whirlpool dryer, it’s crucial to gather the right tools. Having the necessary equipment on hand will streamline the repair and ensure a smoother experience. This section outlines the essential tools you’ll need to successfully complete the task.
Before starting the replacement process, ensure you have all necessary tools and supplies. This preparation will save time and reduce frustration during the repair. Here’s a checklist of what you will need:
| Tool/Supply | Purpose |
|---|---|
| Screwdriver | Remove screws from the dryer panel |
| Multimeter | Test the heating element for continuity |
| Replacement heating element | New part to install |
| Safety gloves | Protect hands during the process |
| Vacuum cleaner | Clean lint and debris from the dryer |
Recommended Products

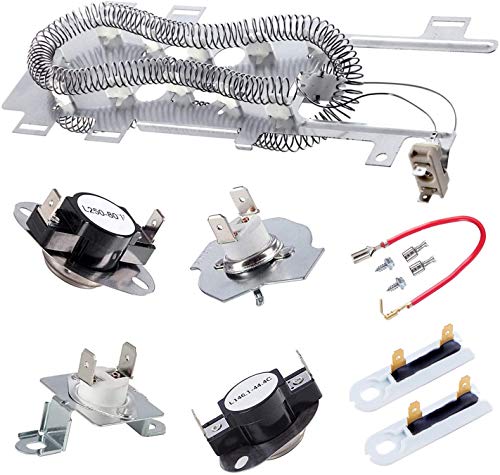
【COMPATIBLE MODELS】: 279838 Dryer Heating Element Parts Compatible with Whirlpool heating element WED4815EW1 WED4800XQ0 WED4800BQ1 WED5300SQ0 MEDX655DW1 MEDC465HW0 ,Maytag heating element NED4655EW1,MEDC465HW0,MED7230HW1,MEDB765FC0,MEDX655DW1,MEDC215EW1, MEDC415EW0, MEDC555DW2, Amana heating element NED4655EW1,NED4655EW0 NED4600YQ1,NED5100TQ1, LER4634EQ0,NED4500VQ0,LER7646JQ0,EED4300SQ0, WED5100VQ1,LER4634JQ1,AED4475TQ1,NED4600YQ1.... compatible with Kenmore 70 80 90 300 400 500 600 series model 110, For more compatible models, please see Figure 6 and Figure 7If you do not confirm, please contact us immediately. We will reply you as soon as possible

【SUPERIOR PERFORMANCE MATERIALS】Our wp3387747 dryer heating element is made with high-quality nickel-chromium (Ni-Cr) content coil and galvanized steel support, ensuring quick and even heating, high anti-corrosion, and durability. With a spiral tight design that is 30% longer than other dryer coils, it increases resistance by more than 70%, providing high performance with low power consumption.(5400Watt 240 Volt)⚠️Be sure to disconnect the power supply before installation

【𝗣𝗘𝗥𝗙𝗘𝗖𝗧 𝗙𝗜𝗧】-- The W10724237 3403585 279838 Dryer heating element kit is compatible with WHIRLPOOL: wed4815ew1, ned4655ew1, wed5000dw2, wed4616fw0, wed5100vq1, wed4950hw0, medx655dw, wed49stbw1, ler8620pg0, medc215ew1, ler7646eq1, wed5300sq0, ler4634eq2, wed5500sq0; MAYTAG: ned4655ew1, medc465hw0, medc215ew1, med7230hw1, medb765fc0, medx655dw1; KENMORE: 70, 80, 90, 300, 400, 500, 600 series models 110 for efficient heating.
Whirlpool Dryer Replacement Safety Preparations
Creating a safe workspace is essential before you begin the replacement. Unplug the dryer from the electrical outlet to prevent any risk of electric shock. Ensure the area is well-ventilated and free from obstructions. Wear safety gloves to protect your hands from sharp edges.
Unplug the dryer to eliminate electrical hazards.
Clear the area around the dryer for easy access.
Wear gloves to guard against injuries.
Accessing Whirlpool Dryer Heating Element Compartment
To successfully replace the heating element in your Whirlpool dryer, the first step involves accessing the heating element compartment. This process requires careful disassembly of specific parts of the dryer to ensure you can reach the heating element safely and efficiently. Follow these detailed instructions to navigate this crucial initial phase of your DIY repair.
To replace the heating element, you need to access the compartment where it is housed. Follow these steps carefully:
Remove the dryer door by unscrewing the hinges.
Detach the front panel by unscrewing the screws that hold it in place.
Lift off the front panel and set it aside to expose the drum.
This process may vary slightly depending on your specific Whirlpool dryer model.
Test Whirlpool Dryer Heating Element Continuity
Testing the continuity of your Whirlpool dryer’s heating element is a crucial step in diagnosing heating issues. This process ensures that the element is functioning properly and can help identify whether it needs replacement. Follow these straightforward guidelines to effectively test the heating element and determine your next steps.
Before replacing the heating element, it is crucial to test it for continuity. This step ensures that the element is indeed faulty. Use a multimeter to perform this test:
Disconnect the wires from the heating element terminals.
Set the multimeter to the ohms setting.
Touch the probes to the terminals of the heating element.
If the multimeter reads zero, the heating element is defective and needs replacement.
Recommended Products
![[UPGRADED] 279838 Dryer Heating Element for Whirlpool Kenmore Maytag Amana Roper, Dryer Heating Element Parts Include Dryer Thermostat Thermal Fuse, Replaces 2406026 3403585 w10724237](https://m.media-amazon.com/images/I/51KK+2MbciL._SL500_.jpg)
Dryer Heating Element Parts Compatible with: kenmore whirlpool roper maytag bravos amana estate cabrio crosley admiral inglis kitchenaid magic chef jenn-air dryers and electric dryers. 279838 dryer heating element replaces part numbers: 3403585 W10724237 3398063 3398064 8565582. Includes: 1 x 279838 dryer heating element,1 x WP3392519 thermal fuse, 1 x 3977393 thermal fuse, 1 x WP3977767 high-limit thermostat,1 x WP3387134 cycling thermostat.

Upgrade 279838 Dryer Heating Element: Pulluty 279838 heating elements have excellent heat and abrasion resistance with up to 95% nickel-chromium content. The heating wire is 25% longer than other common dryer replacement parts.Heats more evenly without damaging clothes. Meets OEM manufacturing standards.

✅[QUALITY GROWTH] Excellent heat-proof and abrasion-proof. 2026 UPGRADE 279838 dryer heating element NICKEL-CHROMIUM content reaches 95% and the length of the heating wire is 25% longer than other common dryer replacement parts. So it will last longer than other brand and OEM parts.
Whirlpool Dryer Heating Element Removal Steps
Replacing the heating element in your Whirlpool dryer can seem daunting, but with the right guidance, it becomes a manageable DIY task. This section outlines the essential steps for safely removing the heating element, ensuring your dryer operates efficiently once again. Follow these instructions carefully to tackle the job with confidence and ease.
Once you confirm the heating element is faulty, proceed to remove it. Follow these steps:
Unscrew the heating element from its mounting bracket.
Carefully pull it out of the compartment.
Inspect the area for any debris or lint buildup.
Cleaning the compartment will enhance the efficiency of the new element.
Whirlpool Dryer Heating Element Installation Steps
Replacing the heating element in your Whirlpool dryer can seem daunting, but with the right guidance, it’s a manageable DIY task. This section outlines the essential steps to efficiently install a new heating element, ensuring your dryer operates at peak performance once again. Follow these instructions carefully to restore warmth to your laundry routine.
With the old heating element removed, it’s time to install the new one. Ensure that the new part is compatible with your Whirlpool dryer model. Follow these steps:
Insert the new heating element into the compartment.
Secure it with screws to the mounting bracket.
Reconnect the wires to the terminals, ensuring a snug fit.
Make sure that all connections are tight to prevent any electrical issues.
Recommended Products
8544771 PACKAGE INCLUDES:1 x wp8544771 dryer heating element, 1 x 279816 thermostat, 1 x 279973 thermal cut-off fuse, 2 x 3392519 thermal fuse. Full complete repair kit fixes dryer all heating issue with one purchase, eliminating the need for additional separate component orders.

Fit Most Models :279838 W10724237 Dryer Heating Element Assembly.Compatible with: whirlpool kenmore maytag amana roper c.abrio c.rosley a.dmiral dryers and electric dryers
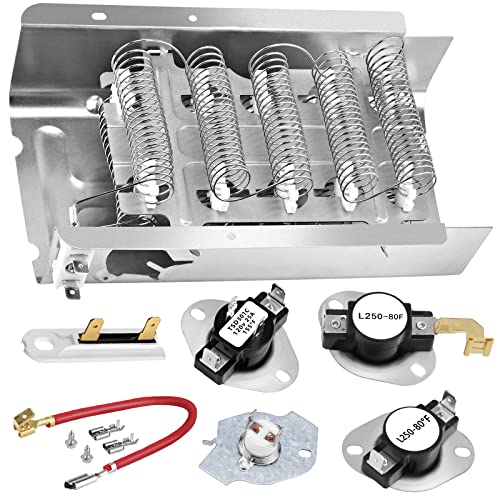
[PACKAGE INCLUDE]: The 279838 dryer heating element fit for Whirlpool Dryer Heating Element. Inludes 1X 279838 dryer heating element,1X 3392519 dryer thermal fuse,1X 279816 Dryer Thermal Cut-Off Kit,1X 3977767 dryer thermostat,1X 3387134 dryer high-limit thermostat. Set two inludes 1X 279838 dryer heating element,1X 279816 Dryer Thermal Cut-Off Kit
Whirlpool Dryer Reassembly Steps After Heating Element Replacement
After successfully replacing the heating element in your Whirlpool dryer, it’s essential to reassemble the unit correctly to ensure optimal performance. This section provides a step-by-step guide to help you put everything back together safely and efficiently, allowing your dryer to function as intended. Follow these instructions carefully to avoid any issues during reassembly.
After installing the new heating element, it’s time to put everything back together. Follow these steps:
Reattach the front panel by aligning it and securing it with screws.
Reinstall the dryer door by attaching the hinges.
Plug the dryer back in to restore power.
Ensure that all parts are securely fastened before operating the dryer.
Verify Whirlpool Dryer Heating Element Functionality
Before diving into the replacement process, it’s essential to confirm that the heating element in your Whirlpool dryer is indeed malfunctioning. This step ensures that you are addressing the right issue, saving time and effort while preventing unnecessary parts replacement. Here’s how to accurately verify the functionality of your dryer’s heating element.
Testing the dryer is crucial to confirm that the new heating element is functioning correctly. Follow these steps:
Set the dryer to a high heat setting.
Run a short cycle and monitor the heat output.
Check for any unusual sounds or smells during operation.
If the dryer heats up properly, the replacement was successful.
Whirlpool Dryer Heating Element Troubleshooting
When your Whirlpool dryer struggles to heat, it often points to a malfunctioning heating element. Understanding the common issues associated with this component can help you diagnose the problem effectively. This section will guide you through troubleshooting steps to identify whether the heating element needs replacement and how to proceed.
If the dryer does not heat after replacing the element, consider these troubleshooting steps:
Check the thermal fuse for continuity.
Inspect the wiring for any loose connections.
Verify the thermostat is functioning as intended.
Addressing these issues may resolve any lingering problems.
Whirlpool Dryer Maintenance Tips for Longevity
Proper maintenance is essential for ensuring the longevity of your Whirlpool dryer. By following a few simple tips, you can keep your appliance running efficiently and avoid costly repairs. This section outlines key practices to help you maintain your dryer and extend its lifespan.
Regular maintenance can prolong the life of your dryer. Keep the lint filter clean and ensure the venting system is unobstructed. This practice will enhance drying efficiency and prevent potential hazards.
Replace the heating element in your Whirlpool dryer as needed to maintain optimal performance.

Hey, I’m Jake. I focus on cooling systems at Appliance Mastery, like fridges, freezers, and air conditioners.
I’ve worked in appliance repair for more than ten years and I’m certified through NASTeC. I’ve seen just about every fridge issue you can imagine.
My goal is to help you fix problems without stress. Whether it’s a freezer that won’t cool or an AC that keeps beeping, I’m here to walk you through it.