
A Whirlpool washer that won’t rinse and spin often indicates issues with the lid switch or drain pump. Troubleshooting these components can resolve the problem without needing professional help.
Whirlpool Washer Rinse and Spin Problems
If your Whirlpool washer is struggling with rinse and spin cycles, you’re not alone. Many users encounter similar issues, which can stem from various causes such as clogs, mechanical failures, or user errors. Understanding these common problems can help you troubleshoot effectively and restore your machine’s functionality.
Understanding the symptoms can help pinpoint the problem. A Whirlpool washer may fail to rinse and spin due to various reasons. Common signs include:
No water draining from the tub
Unusual noises during the cycle
Lid switch not engaging
Error codes displayed on the control panel
Recognizing these symptoms allows for a more focused approach to troubleshooting.
Whirlpool Washer Rinse and Spin Issues Guide
If your Whirlpool washer is failing to rinse and spin properly, it can be frustrating and inconvenient. This guide will help you diagnose common issues and provide straightforward troubleshooting steps to get your machine back in working order. With a few simple checks, you can often resolve the problem without needing professional assistance.
Use this table to quickly identify potential causes and their difficulty levels.
| Symptom | Primary Suspect | Difficulty (1-5) |
|---|---|---|
| No rinse or spin | Lid switch | 2 |
| Water not draining | Drain pump | 3 |
| Unusual noises | Drive belt | 4 |
| Error codes | Control board | 5 |
Whirlpool Washer Lid Switch Functionality
Understanding the functionality of the lid switch in your Whirlpool washer is crucial when troubleshooting issues like failure to rinse and spin. This component plays a vital role in ensuring the machine operates correctly, and recognizing its importance can help you diagnose problems effectively. Here’s a closer look at how the lid switch works and its impact on your washer’s performance.
The lid switch is a critical component that prevents the washer from spinning if the lid is open. If the switch is faulty, the washer may not complete the rinse and spin cycles.
Whirlpool Washer Lid Switch Testing Guide
If your Whirlpool washer isn’t rinsing and spinning, one common culprit could be a faulty lid switch. This guide will walk you through the essential steps to test the lid switch, helping you identify whether it’s the source of the problem. Follow these straightforward instructions to troubleshoot effectively and get your washer back in working order.
Unplug the washer to ensure safety.
Locate the lid switch near the lid hinge.
Use a multimeter to check for continuity. If there is no continuity, the switch needs replacement.
Whirlpool Washer Lid Switch Replacement Guide
If your Whirlpool washer isn’t rinsing and spinning properly, a faulty lid switch might be the culprit. This guide will walk you through the steps to replace the lid switch, ensuring your washer operates smoothly again. With a few tools and some straightforward instructions, you can tackle this common issue yourself.
Purchase a compatible lid switch for your model.
Remove the control panel to access the switch.
Disconnect the old switch and connect the new one.
Reassemble the control panel and plug in the washer.
Whirlpool Washer Drain Pump Inspection Steps
If your Whirlpool washer is failing to rinse and spin, a common culprit could be the drain pump. Inspecting this component is crucial for diagnosing the issue effectively. The following steps will guide you through a straightforward inspection process to determine if the drain pump is functioning properly.
If the washer fills with water but does not drain, the drain pump may be clogged or malfunctioning. A blocked pump can prevent the rinse and spin cycles from starting.
Recommended Products

PARTS SPECIFICATIONS: 8181684 280187 Washer Drain Pump. (110V-127V)(60Hz-85W-1.4A)(1.5m-45L/Min)
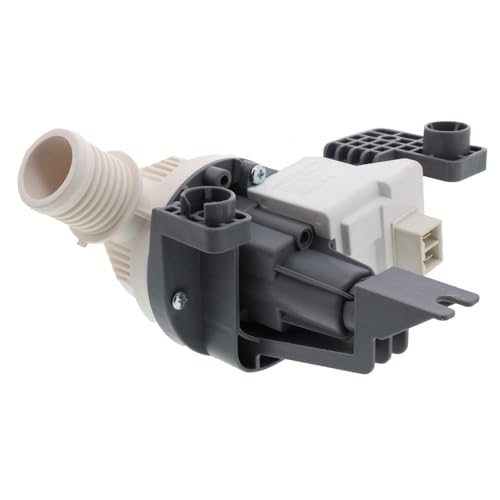
▶ This is a brand new ClimaTek Washer Drain Pump
Whirlpool Washer Drain Pump Issues
If your Whirlpool washer isn’t rinsing and spinning properly, the drain pump may be the culprit. Understanding how to identify and troubleshoot common drain pump issues can help you restore your washer’s functionality. This section will guide you through the signs of drain pump problems and offer practical solutions for easy repairs.
Unplug the washer to avoid electrical hazards.
Access the drain pump by removing the lower front panel.
Check for blockages in the pump and hoses. Clear any debris found.
Whirlpool Washer Drain Pump Replacement Guide
If your Whirlpool washer is struggling to rinse and spin, a malfunctioning drain pump might be the culprit. This guide will walk you through the process of replacing the drain pump, ensuring your washer operates efficiently again. With straightforward steps and essential tips, you’ll be able to tackle this DIY repair with confidence.
Acquire a new drain pump that fits your Whirlpool model.
Disconnect the old pump by removing the mounting screws.
Install the new pump and secure it in place.
Reattach the front panel and plug in the washer.
Whirlpool Washer Drive Belt Inspection Guide
If your Whirlpool washer isn’t rinsing or spinning properly, a common culprit could be the drive belt. This guide will help you inspect the drive belt to determine if it’s worn or damaged, which can affect the washer’s performance. Follow these steps to ensure your appliance is functioning optimally.
A worn or broken drive belt can also cause the washer to fail during the rinse and spin cycles. Inspecting the belt is essential for proper operation.
Whirlpool Washer Drive Belt Inspection Steps
If your Whirlpool washer is struggling with rinsing and spinning, a common culprit could be the drive belt. Inspecting this component is a straightforward process that can help you identify any issues. Follow these steps to ensure your washer operates efficiently and effectively.
Unplug the washer to ensure safety.
Remove the back panel to access the drive belt.
Inspect the belt for signs of wear or damage. A loose or broken belt will need replacement.
Whirlpool Washer Drive Belt Replacement Guide
If your Whirlpool washer isn’t rinsing and spinning properly, a worn or damaged drive belt could be the culprit. This guide will walk you through the steps to replace the drive belt, helping restore your washer’s functionality. With the right tools and a bit of patience, you can tackle this DIY repair with confidence.
Purchase the correct drive belt for your model.
Remove the old belt from the pulleys.
Install the new belt by threading it around the motor and drum pulleys.
Reassemble the back panel and plug in the washer.
Whirlpool Washer Control Board Malfunctions
A malfunctioning control board can be a common culprit when your Whirlpool washer fails to rinse and spin. Understanding the signs of control board issues is essential for effective troubleshooting. This section will guide you through identifying potential problems and offer straightforward solutions to get your washer back in working order.
If other components check out, the control board may be malfunctioning. This can prevent the washer from executing the rinse and spin cycles properly.
Whirlpool Washer Control Board Diagnosis
Diagnosing the control board of your Whirlpool washer is a crucial step when it won’t rinse and spin. This component is responsible for managing the machine’s functions, and understanding its role can help you pinpoint the issue. In this section, we will explore how to effectively assess the control board for any faults.
Unplug the washer for safety.
Inspect the control board for burnt components or loose connections.
Use a multimeter to test for power and continuity.
Whirlpool Washer Control Board Replacement Guide
If your Whirlpool washer is not rinsing and spinning properly, the control board might be the culprit. This guide provides a straightforward approach to diagnosing and replacing the control board, ensuring your washer operates efficiently once again. Follow these steps to tackle the issue with confidence and restore your appliance’s functionality.
Acquire a new control board specific to your model.
Disconnect the old board by removing the screws and connectors.
Install the new board and reconnect all wiring.
Reassemble the control panel and plug in the washer.
Whirlpool Washer Repair Tools Checklist
When tackling issues with a Whirlpool washer that won’t rinse and spin, having the right tools on hand can make the repair process smoother and more efficient. This checklist outlines essential tools needed for diagnosing and fixing common problems, ensuring you’re well-prepared for your DIY repair journey. Equip yourself with these items to streamline your troubleshooting efforts.
Before starting any repairs, ensure you have the necessary tools and supplies. This list includes:
Screwdriver set
Multimeter
Replacement parts (lid switch, drain pump, drive belt, control board)
Towels for spills
Recommended Products

Product Information---120V | 60Hz | 0.95A | 0.7W, Complete assembly, including motor, filter, and inlet / outlet plastic housing. Drop-In Replacement Pump 280187 fully encapsulated inside the grey plastic therefore winding wire is not exposed,This is a better & Safer design.

【1 PACK 3363394 WASHER PUMP】-- 3363394 Kenmore Drain Pump is manufactured for washing machines that do not have belts. It is located in the washing machine drainage system and is used to drain the water from the washing machine.This 3363394 washing machine drain pump has one large and one small port. The large port is 1.6 inches in diameter and the small port is 1.2 inches in diameter. One port connects to the washing tub and the other to the outside of the washing machine for more effective control of the water output
Whirlpool Washer Repair Safety Guidelines
When tackling repairs on your Whirlpool washer, safety should always be your top priority. Understanding the essential safety guidelines can help prevent accidents and ensure a smooth repair process. This section outlines key precautions to take before you begin working on your appliance.
Always prioritize safety when working on appliances. Ensure the washer is unplugged before beginning any repairs. Wear gloves and safety glasses to protect yourself from sharp edges and electrical components.
Whirlpool Washer Test Cycle Confirmation Steps
If your Whirlpool washer isn’t rinsing and spinning as it should, confirming the test cycle can help diagnose the issue. This section outlines the essential steps to perform the test cycle, allowing you to identify any underlying problems before attempting further repairs. Follow these instructions carefully to ensure your washer operates effectively.
After completing repairs, run a test cycle to confirm that the washer rinses and spins correctly. Monitor for any unusual sounds or leaks during operation. If issues persist, consult a professional technician for further diagnosis.

Hey, I’m Jake. I focus on cooling systems at Appliance Mastery, like fridges, freezers, and air conditioners.
I’ve worked in appliance repair for more than ten years and I’m certified through NASTeC. I’ve seen just about every fridge issue you can imagine.
My goal is to help you fix problems without stress. Whether it’s a freezer that won’t cool or an AC that keeps beeping, I’m here to walk you through it.